How I Hosted my Personal Site
AWS S3 + AWS Route 53 + Cloudflare
14 minute read
I recently deployed my site to AWS and Cloudflare. Here is a tutorial of how I did it.
Background
I choose AWS as a hosting solution due to it's generous free tier and relevance to the industry. Around 6% of all websites are hosted on AWS. Not a measly contender by any means. It might seem like overkill and to host a static website in the cloud, but as long as it is free, I see no harm in doing so. Likewise, Clouflare has a large marketshare in the static websites business and also has a generous free tier. So far, I haven't paid a cent in hosting fees and my site has achieved high up-time and availability. Theoritically, you could do everything in AWS but I decided to branch out to Cloudflare for a CDN, which I discuss later in the blog.
Prerequisities
As a prerequisite, you should have
- An AWS Account
- A Cloudflare Account
- A static site
Steps
Step 1 : Getting a Domain Name
To host your content on the internet we'll need a domain name registered with a domain register. AWS has it's own domain registar called Route 53. We'll use this service to buy and set up our domain. Log into your AWS Management Console, then type "Route 53" in the search bar. Click on "Route 53" in the results. On the left side of the screen, click the hamburger navigation icon to expand the sidebar. Then select "Register Domains" from the options.

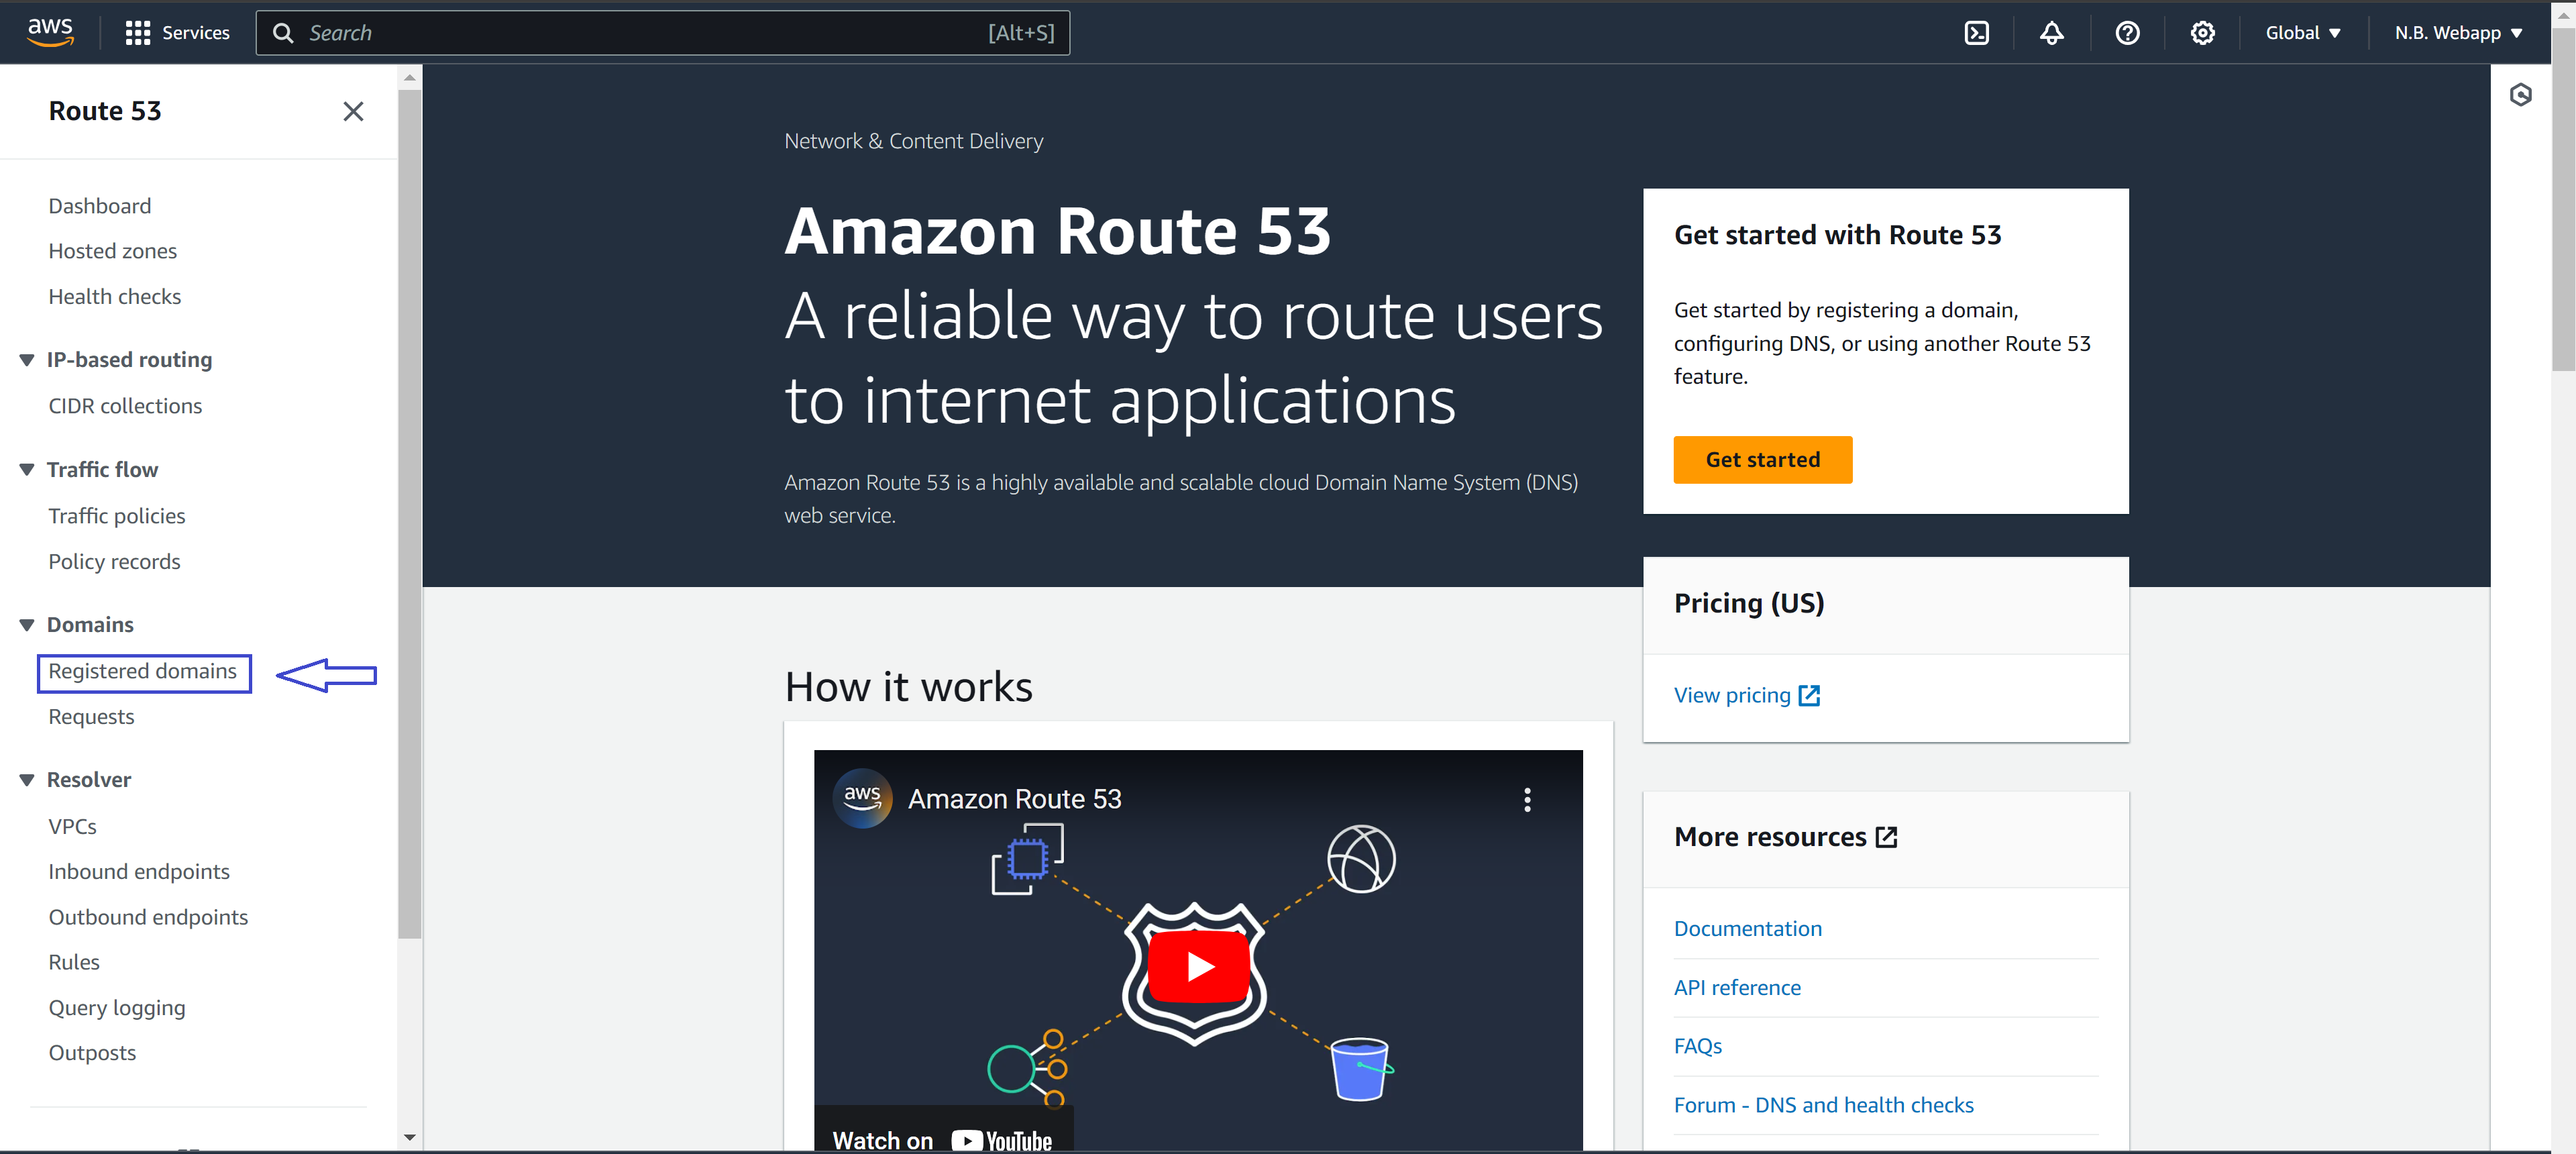
This should bring you to the Registered Domains view, hit the "Register domains" button.

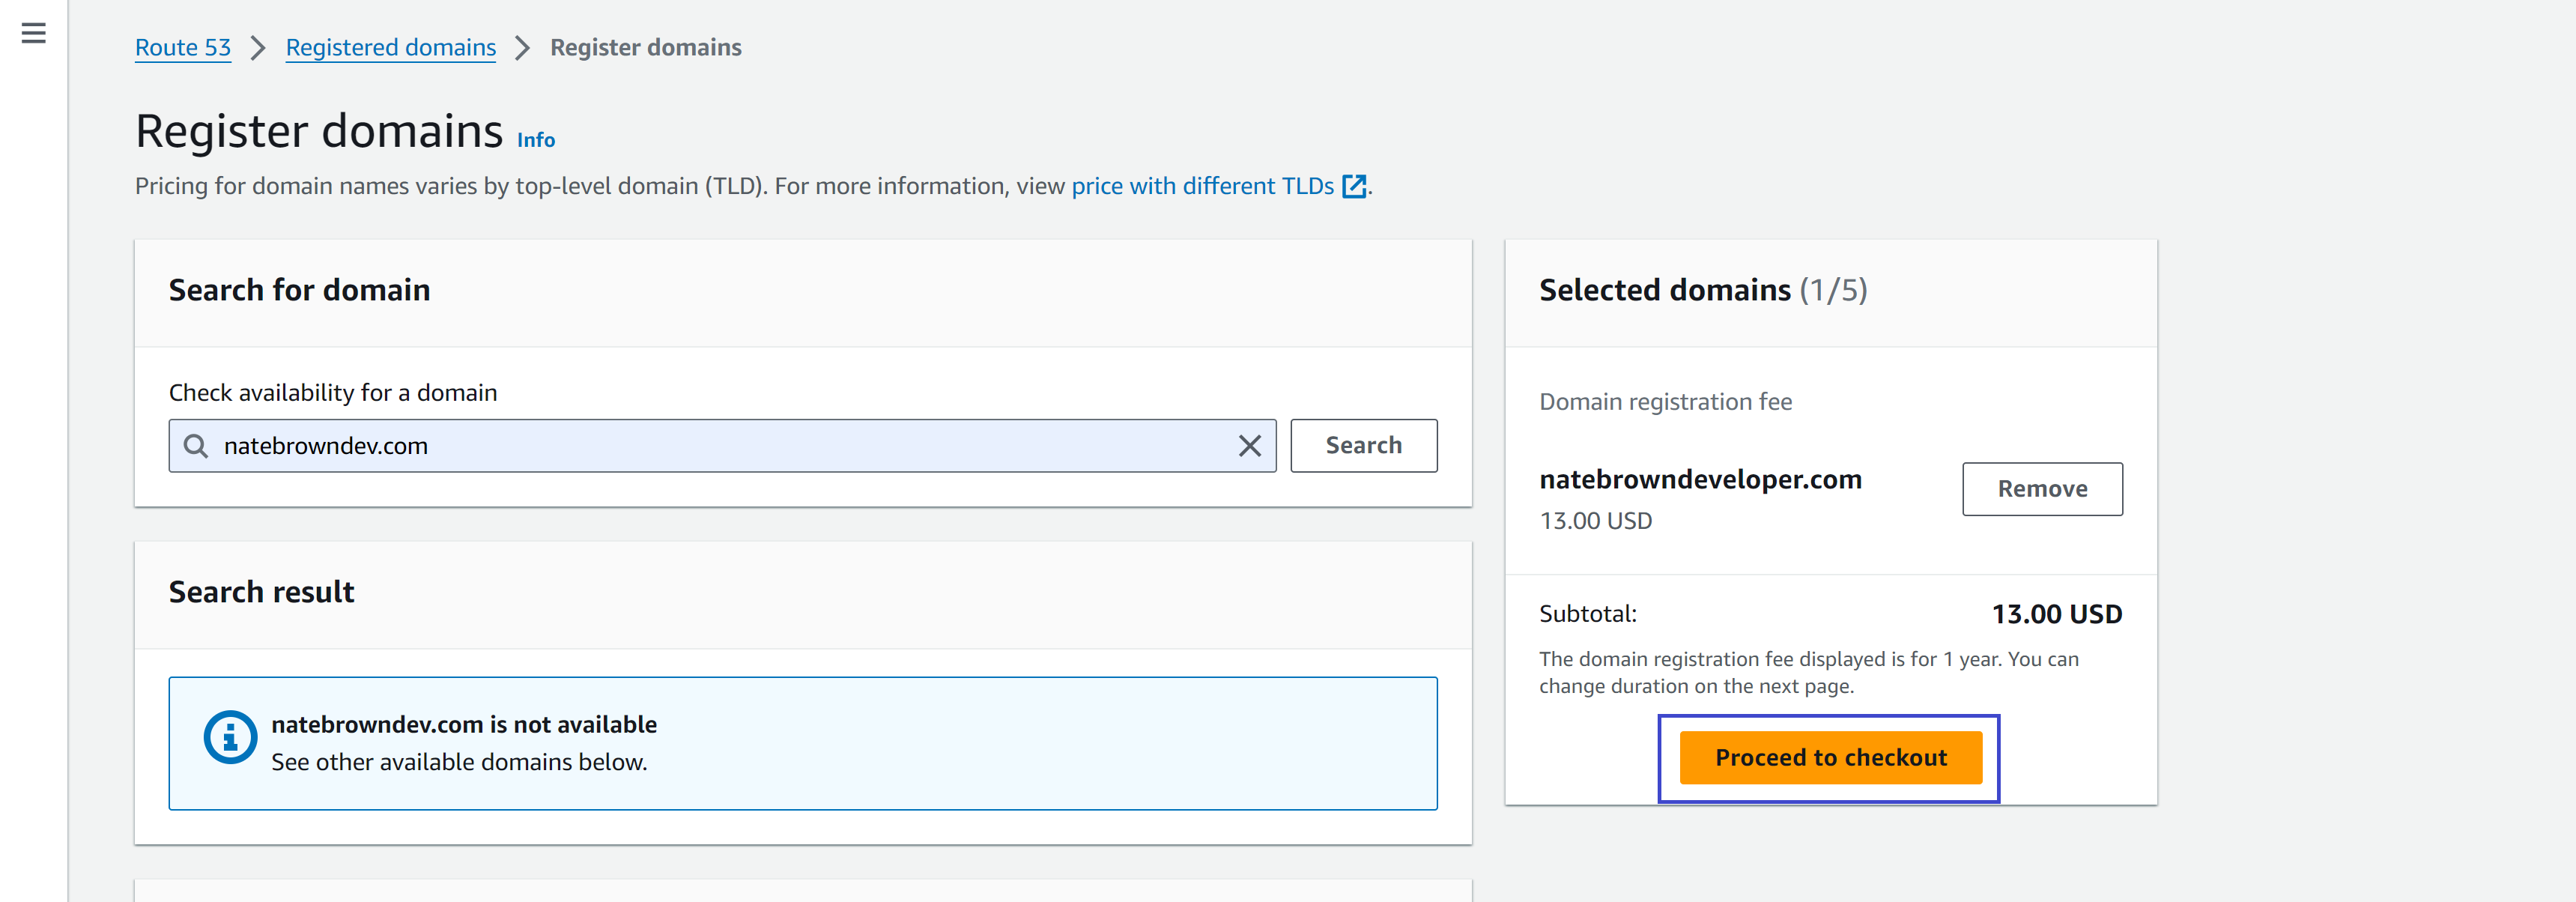
Now you can create a domain (think google.com). Domain names are rented from domain resgistar companies for a fee, paid yearly. I went with natebrowndev.com for my domain (obviously) and it only costs $13 a year. There is no getting around this fee as all domain registars charge a fee of some sorts. Though some domain extensions are more expensive than others. See this document from AWS to find all the supported TLD extensions (not all TLDs are supported by AWS). The only consideration I would have at this point is, keep the first website name fairly cheap as you can change it later, but don't use too long of a name. No one wants to visit myfirstreactwebsitehostedonawsandcloudflare.technology. Once you have your domain selected and it is available, hit "Proceed to Checkout".
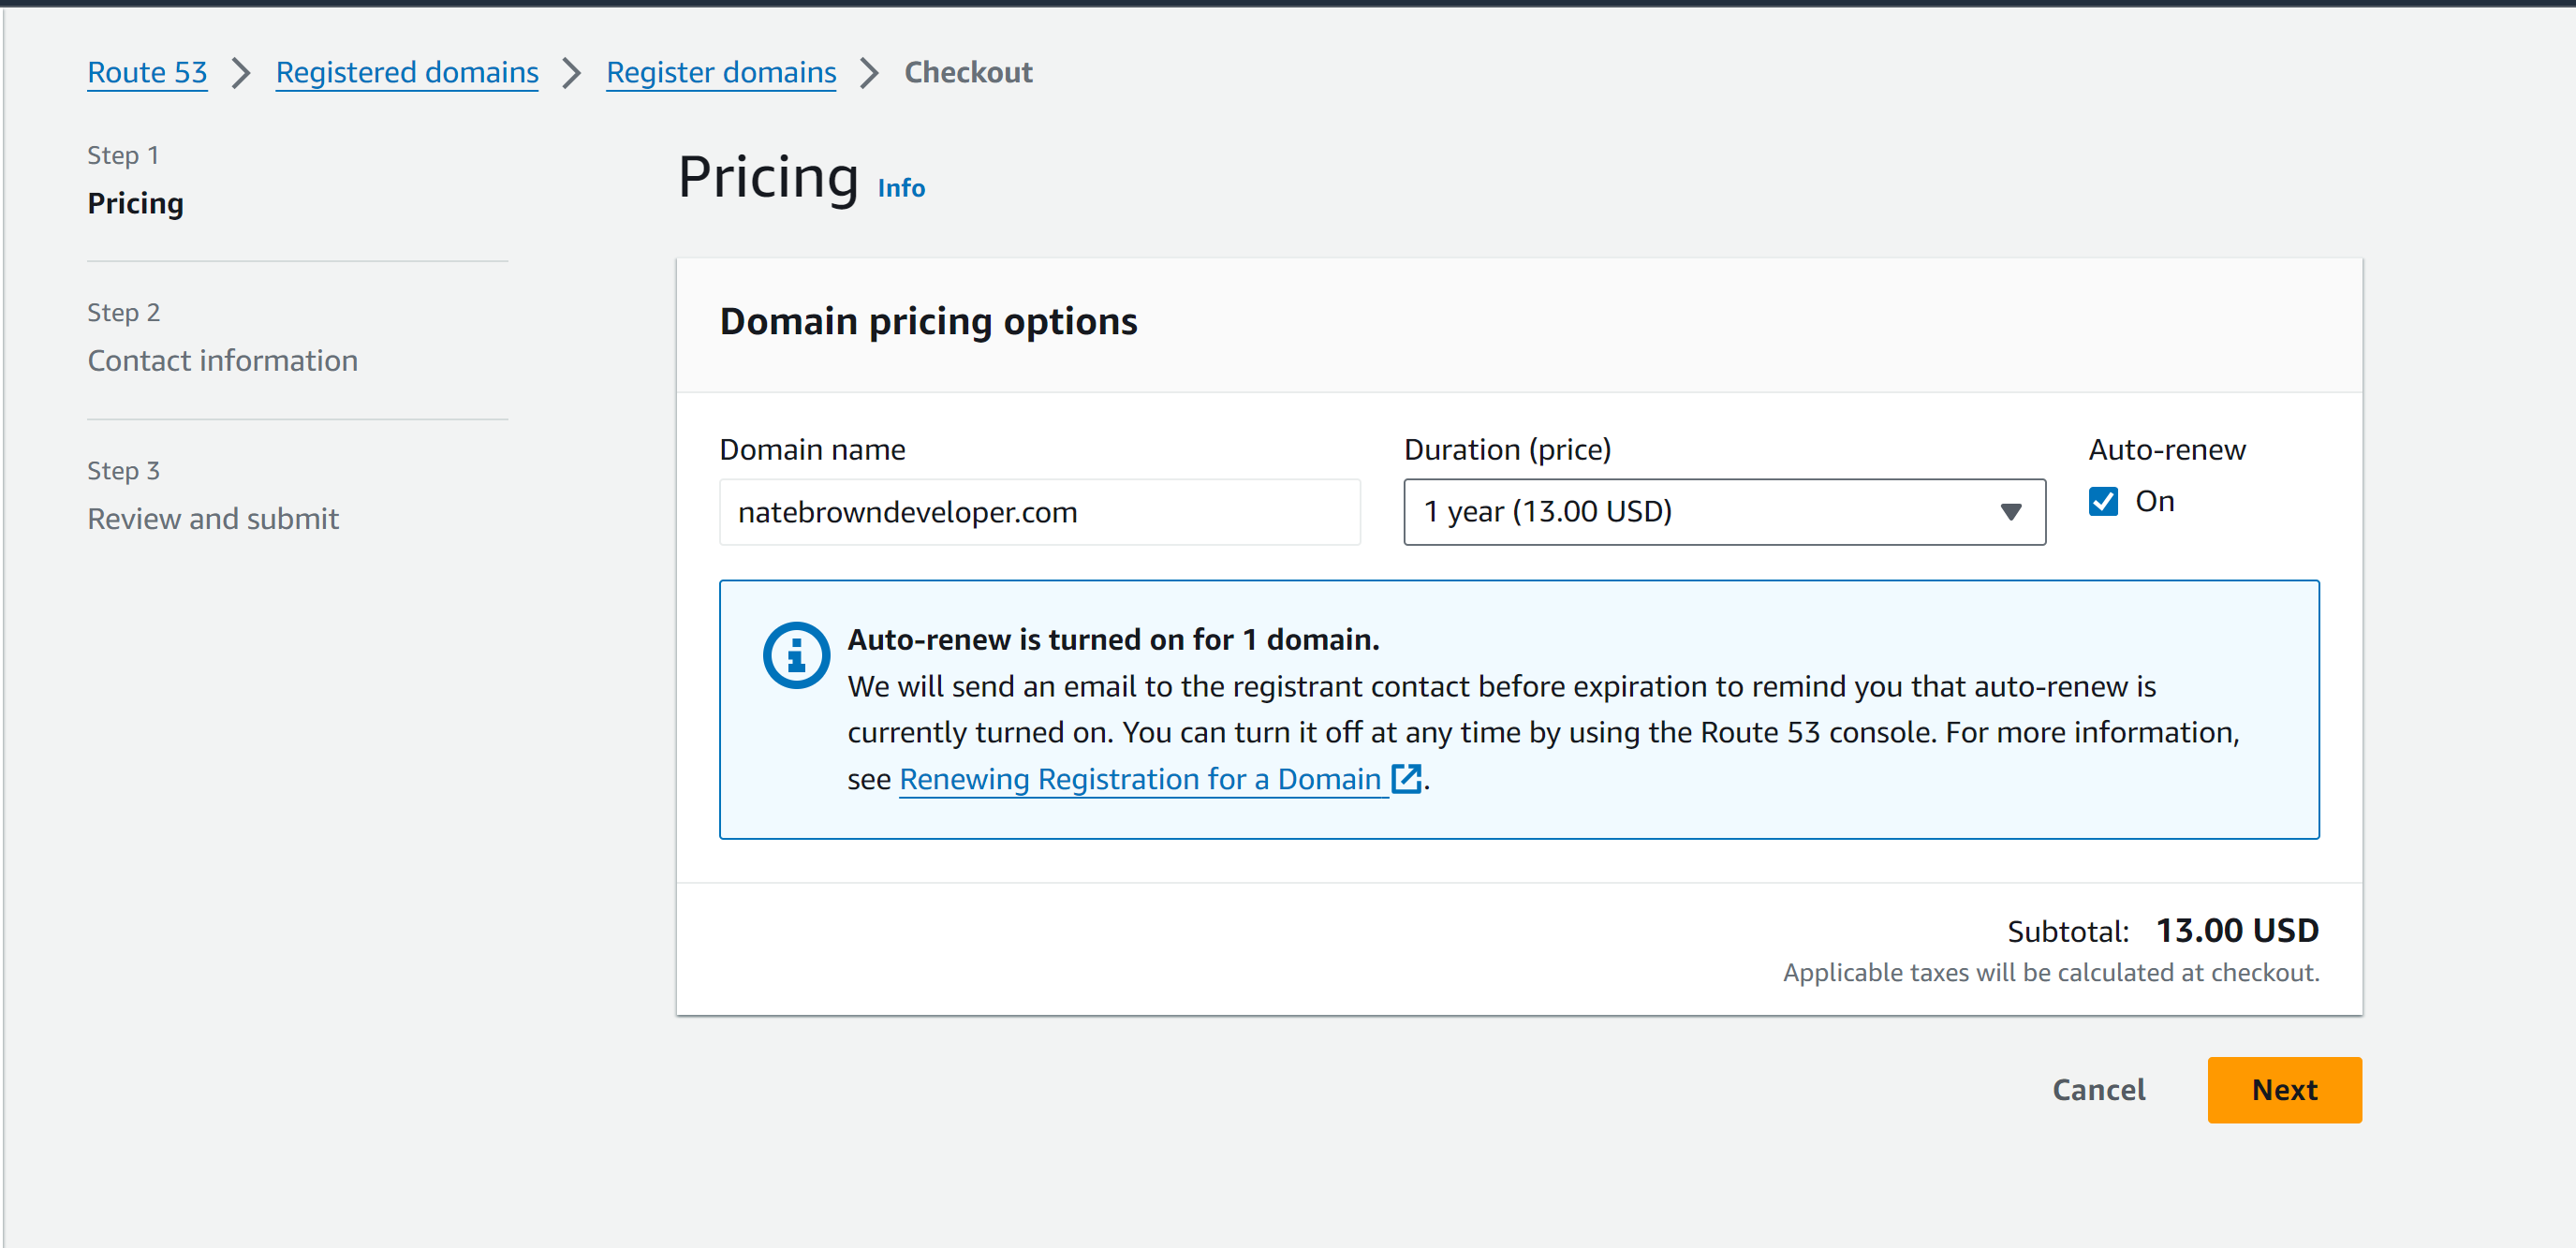
On the next screen, you'll see the price of your domain. By default, AWS checks the auto-renew box. If you don't want to auto-renew uncheck this. I plan on using this domain for a while so I kept mine checked. Once you hit, "Next" you'll be brought to a screen asking for personal information. Fill out all the fields under the "Registrant contact" section and leave defaults for the other fields. Hit "Next".
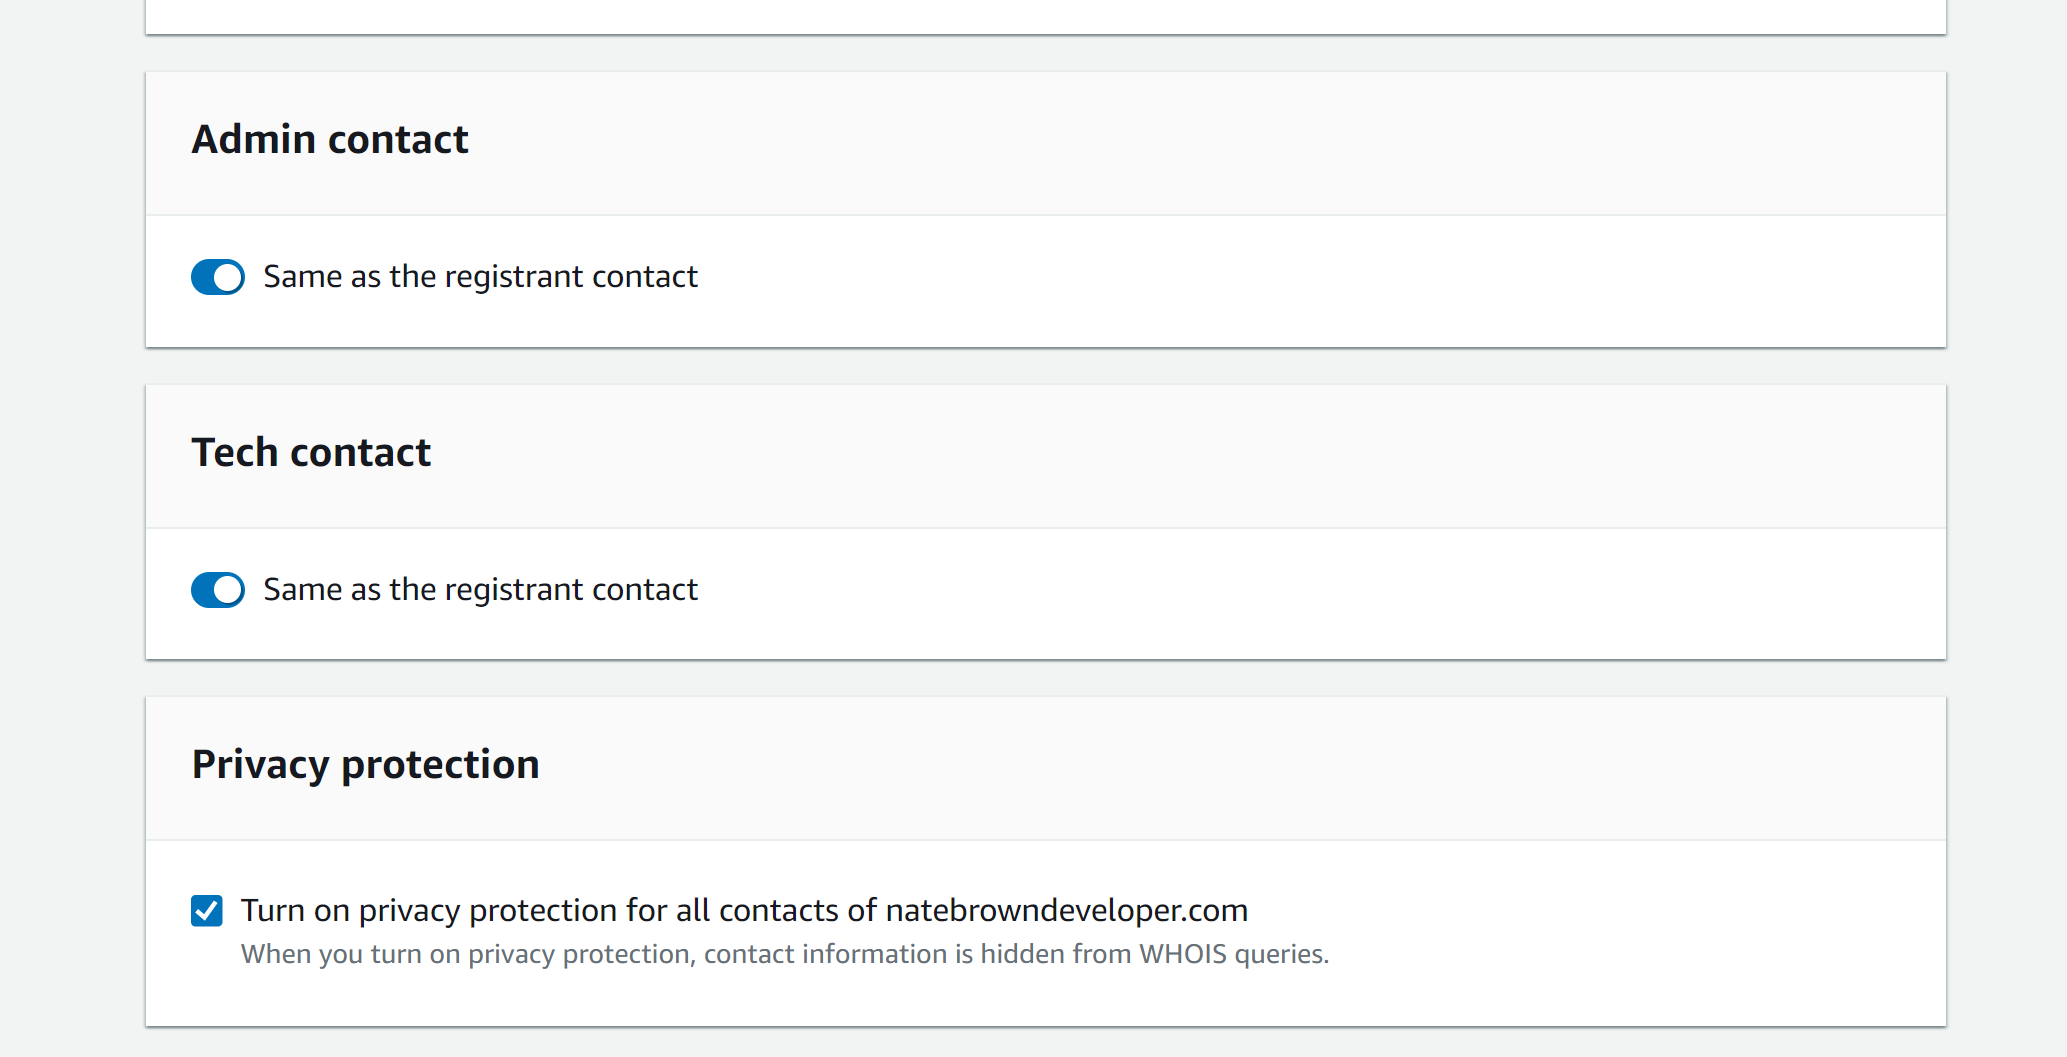
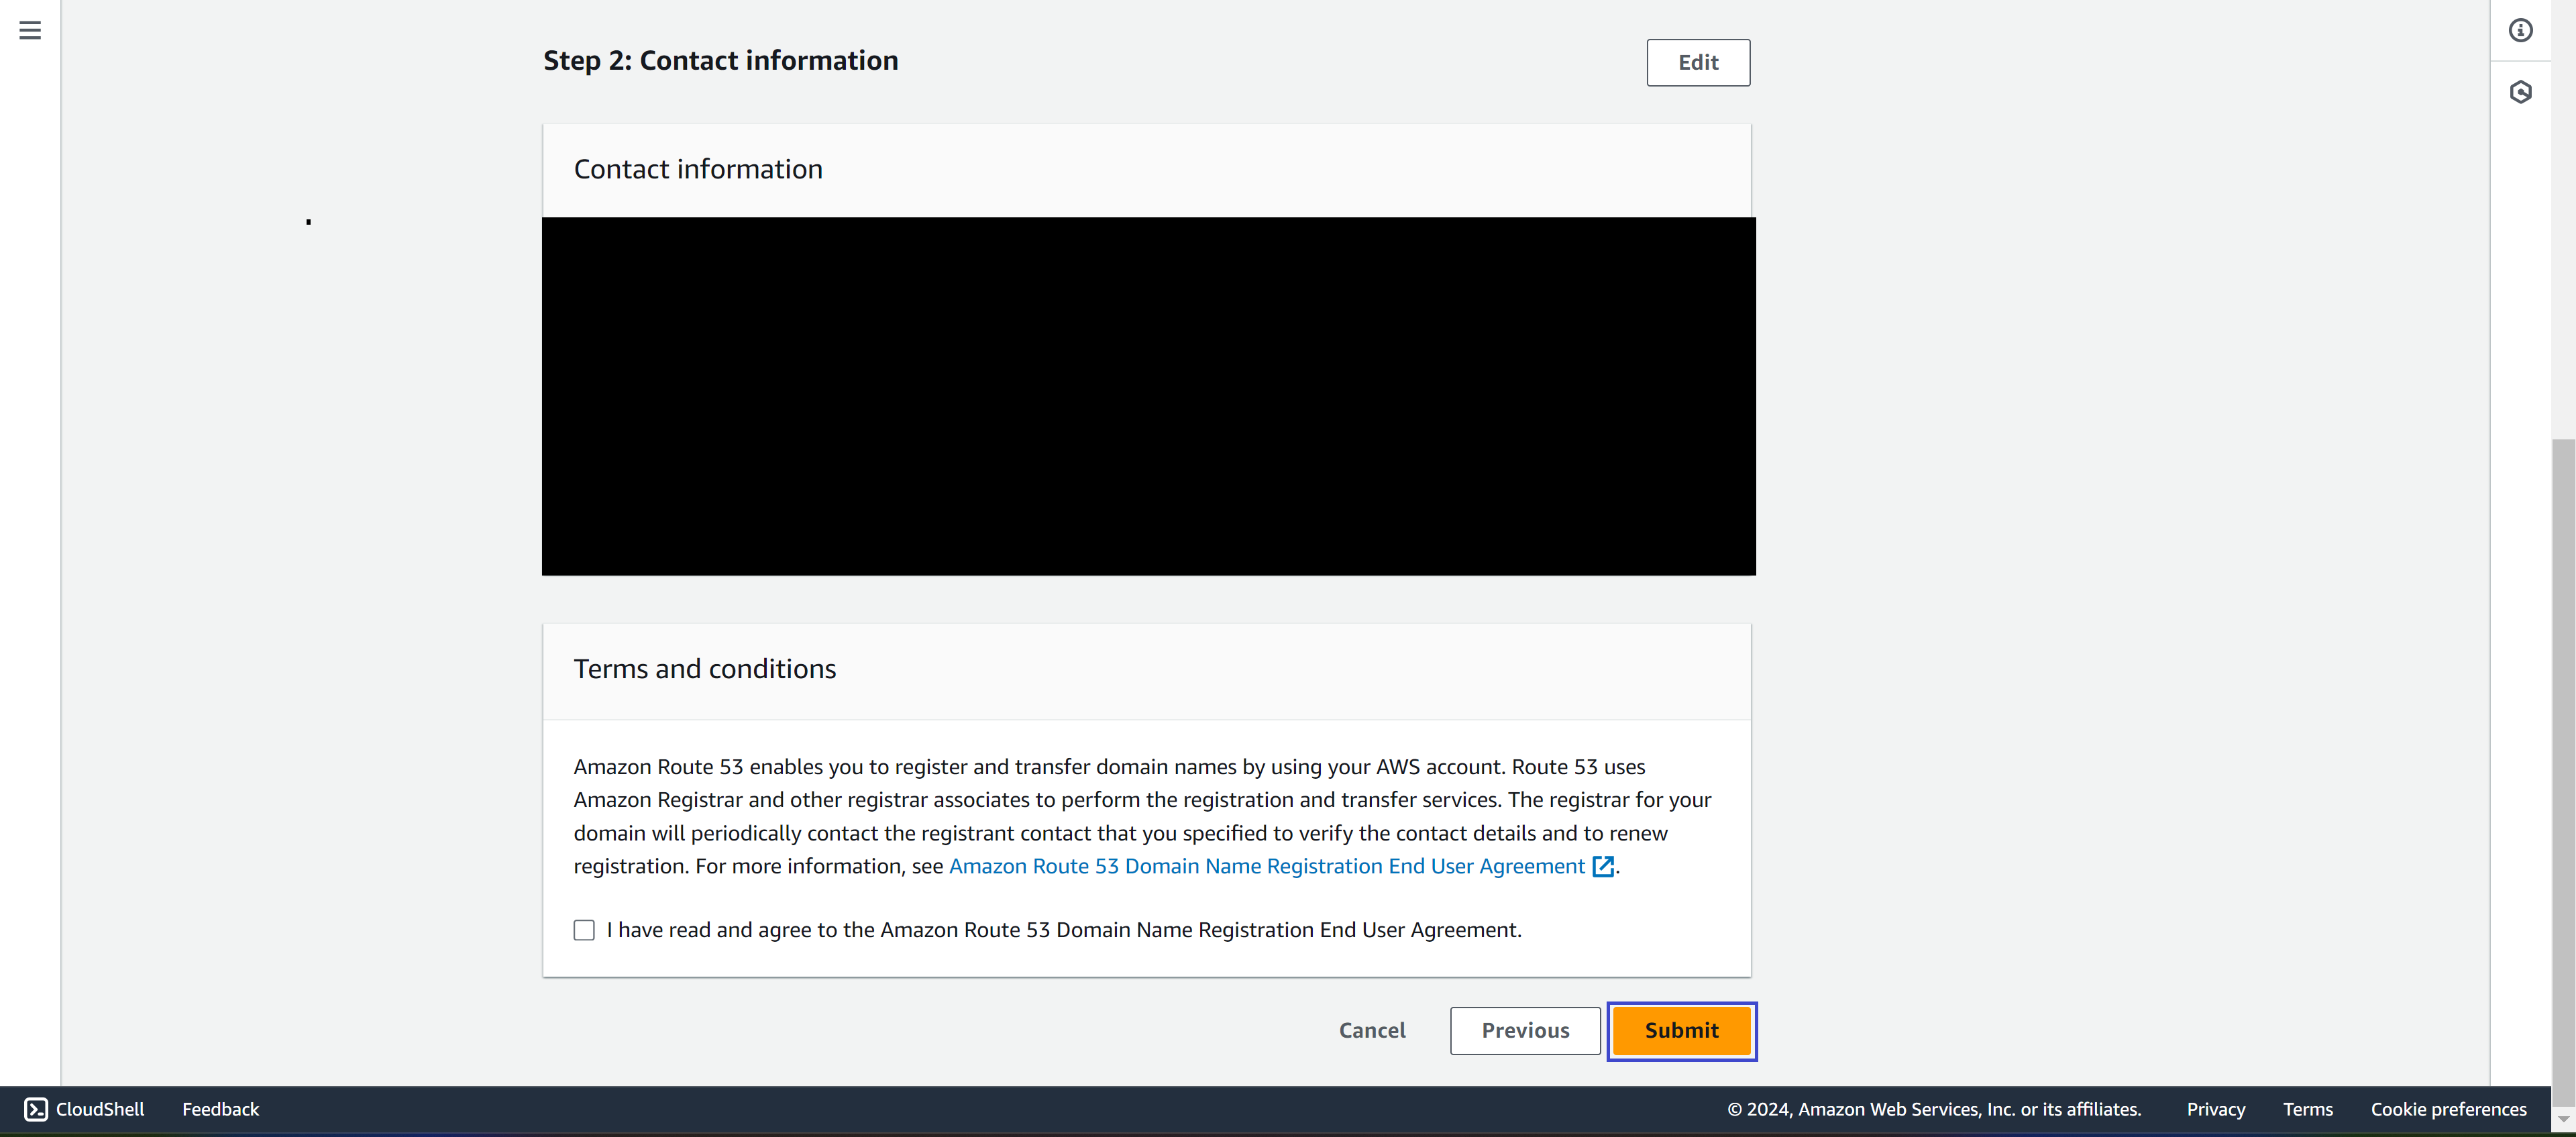
Review your contact details in this screen, agree to the Terms and Conditions, then hit "Submit".
Congradulations! We are done with step 1. It may take up to 24 hours for you domain information to sync across the system, but from experience it never takes that long. My domain was ready in 5 minutes. Now you have your domain name, we can start actually uploading site content.
Step 2: Setting up the S3 Buckets
Head over to S3 by typing "S3" into the search bar and clicking the result. Then click, "Create Bucket" on the S3 screen.

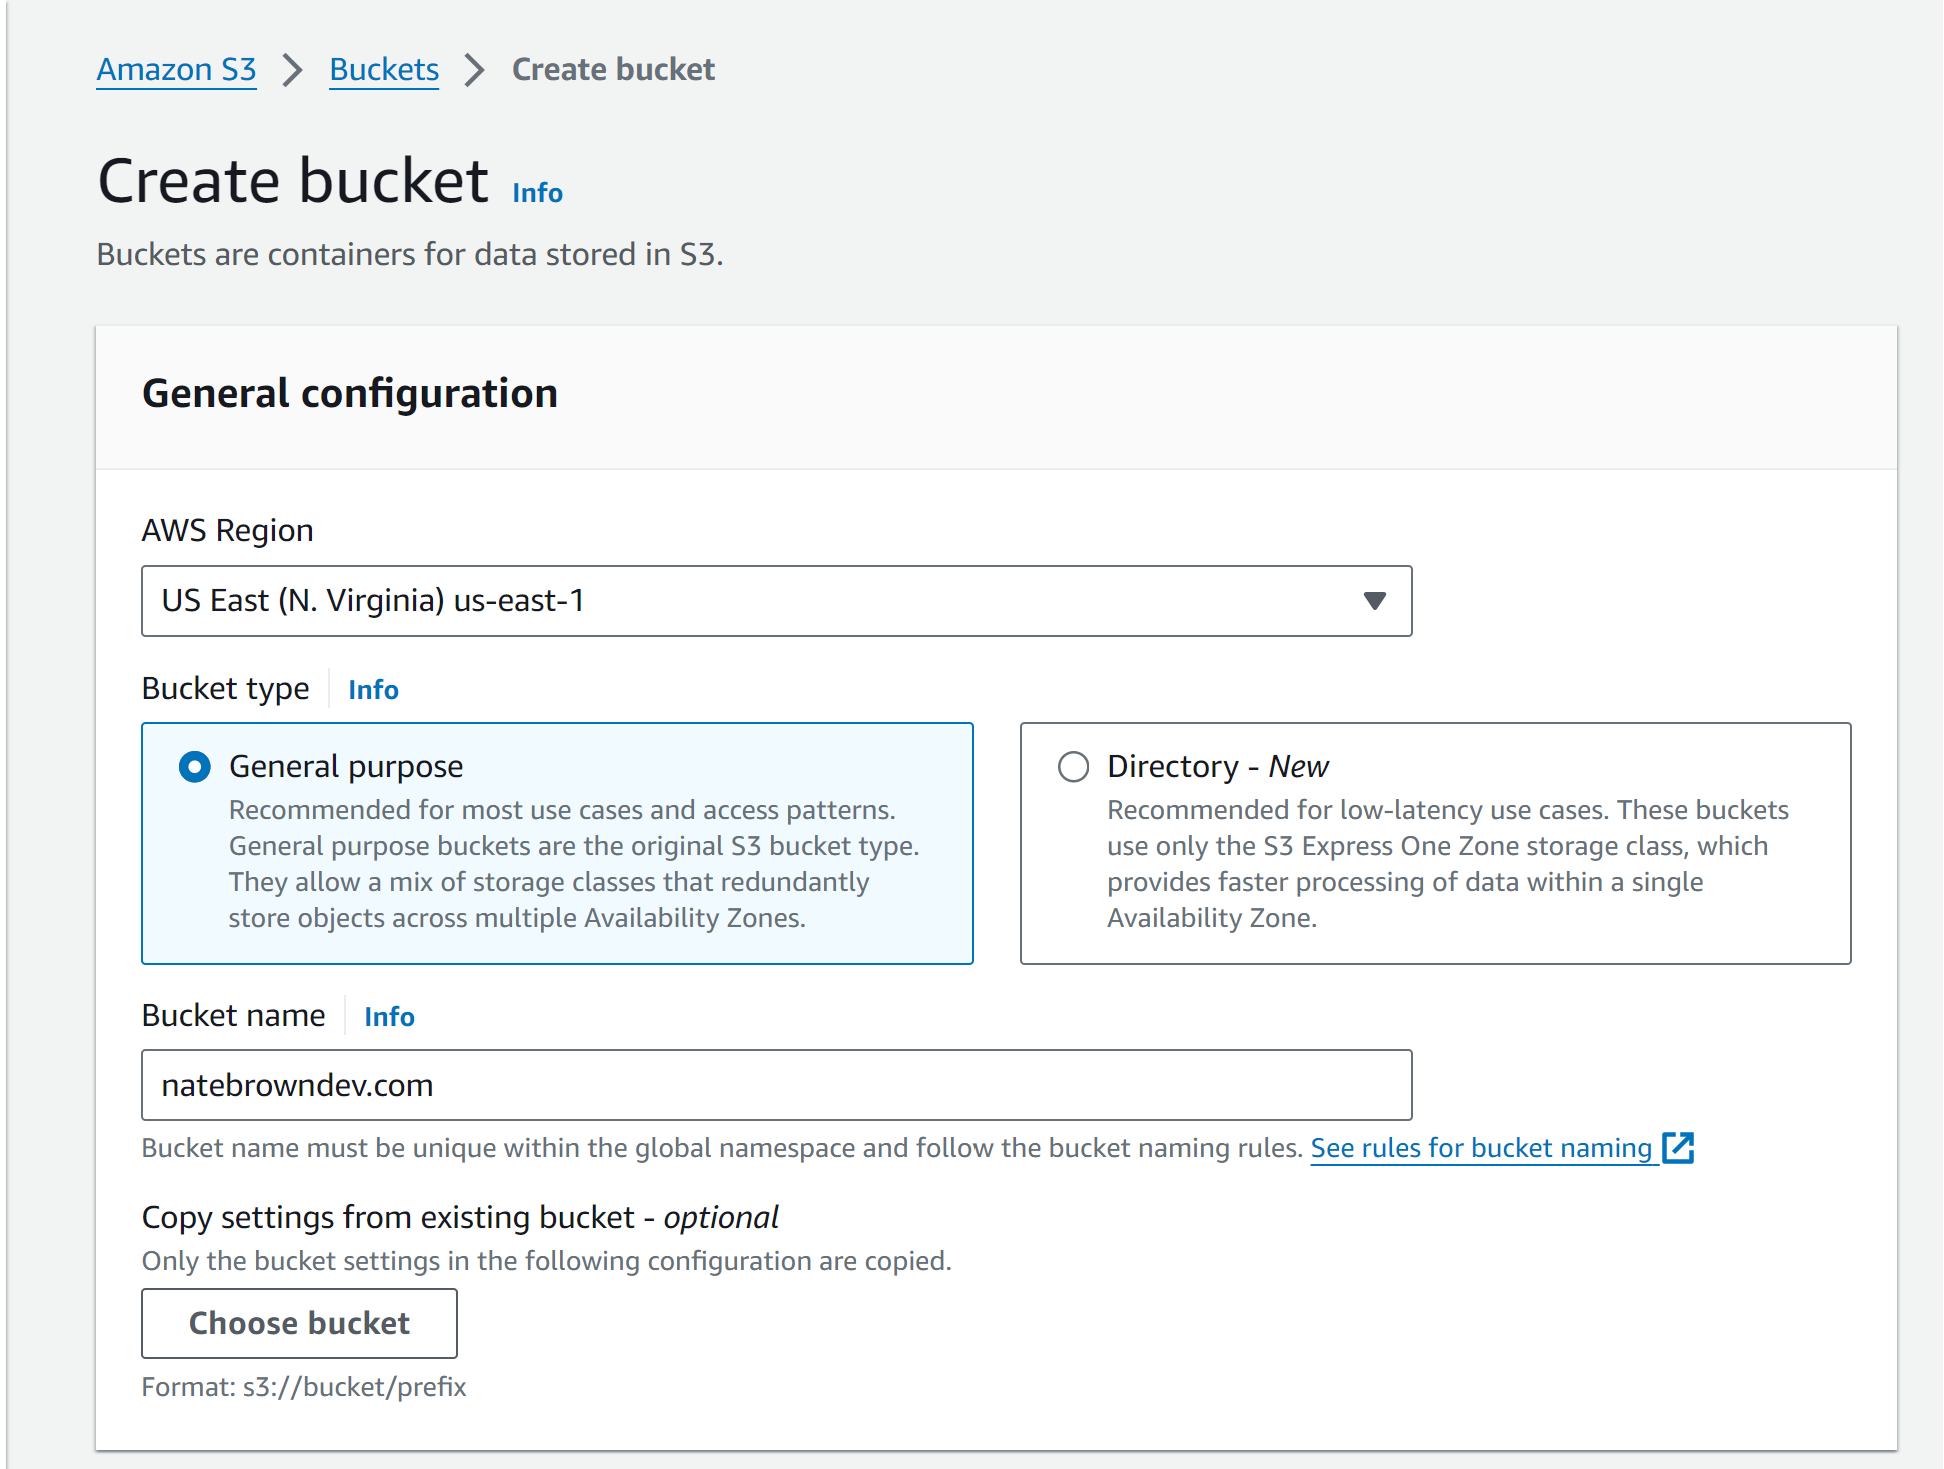
Once your at the create bucket screen name your bucket. Your bucket name must match your website name exactly, or you might face DNS issues. Later in the tutorial we'll create a second bucket.
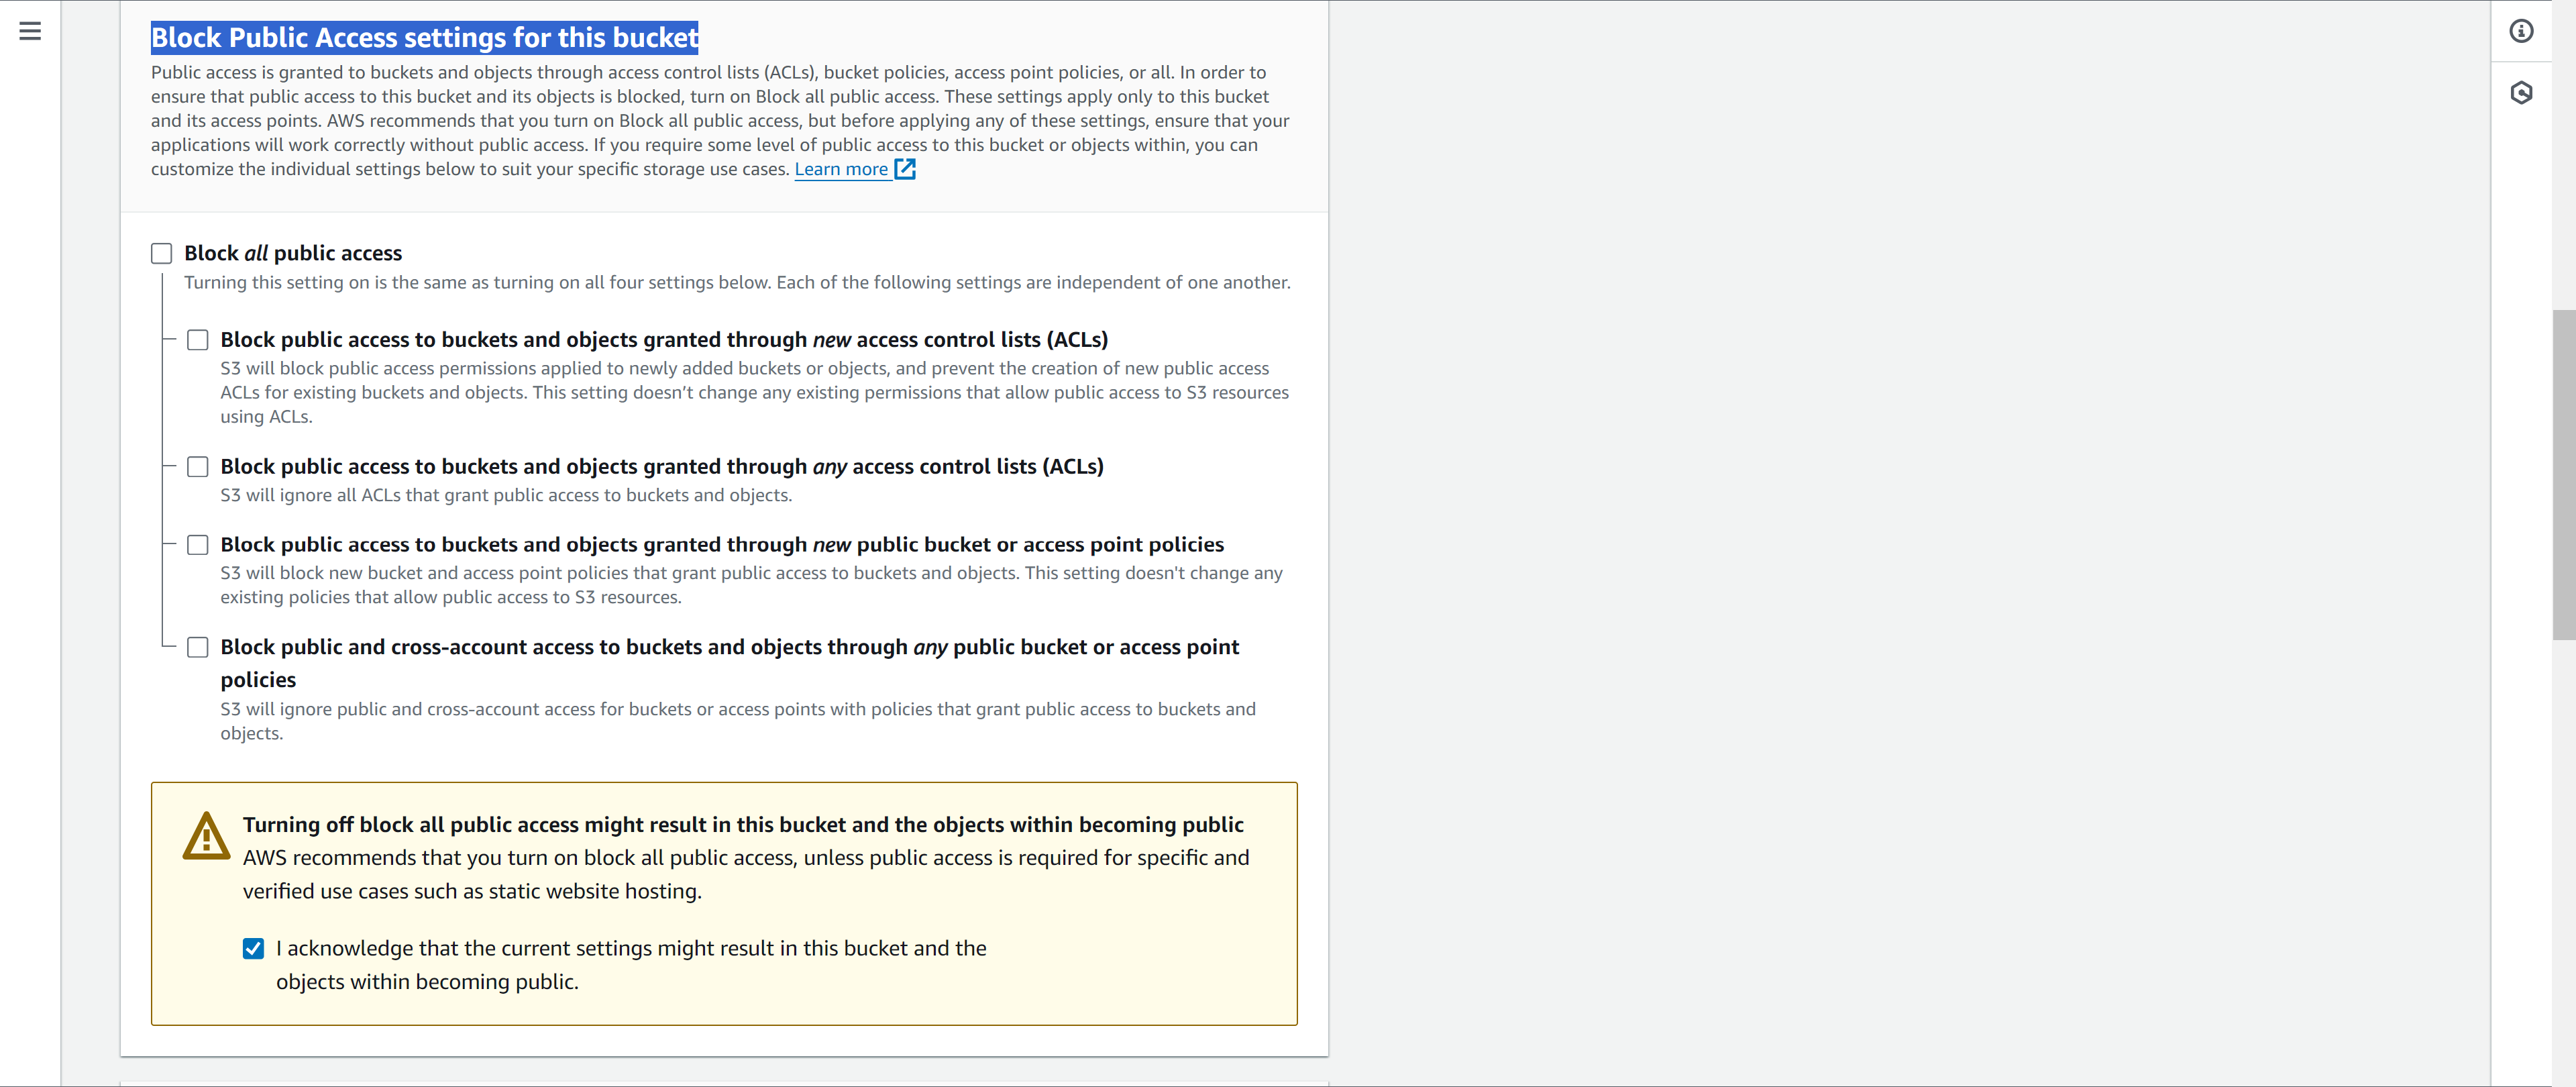
Head over to the "Block Public Access settings for this bucket" section and uncheck the top option. We need to allow public access to this bucket in order to serve content to the folks that visit our site. Also make sure you check the acknowledgement that the content in the bucket will become public. Leave the rest of the settings and hit "Create Bucket" at the bottom of the page.
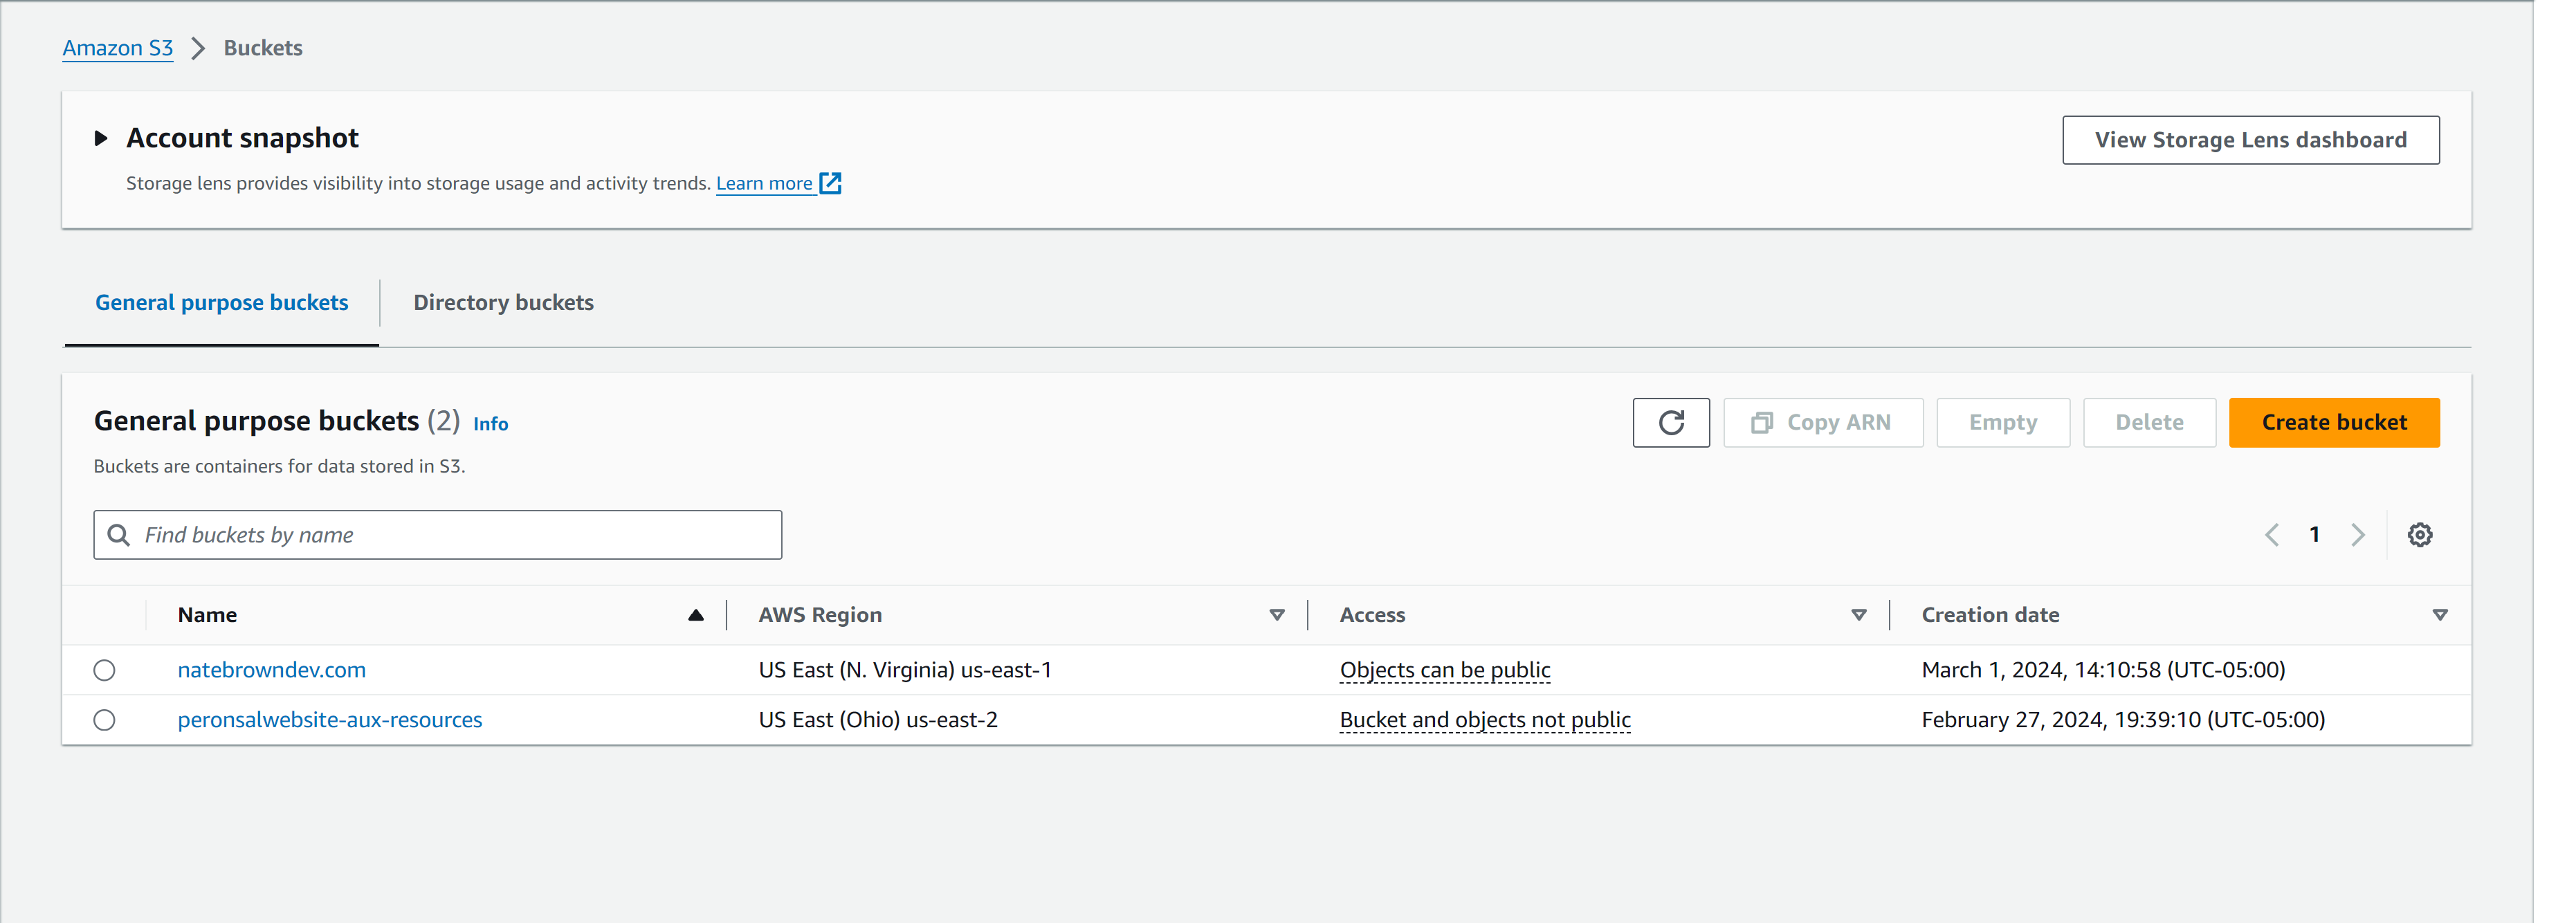
It can take a minute for the bucket to be created, but once it is you'll see it back at the main S3 view. Select the bucket.
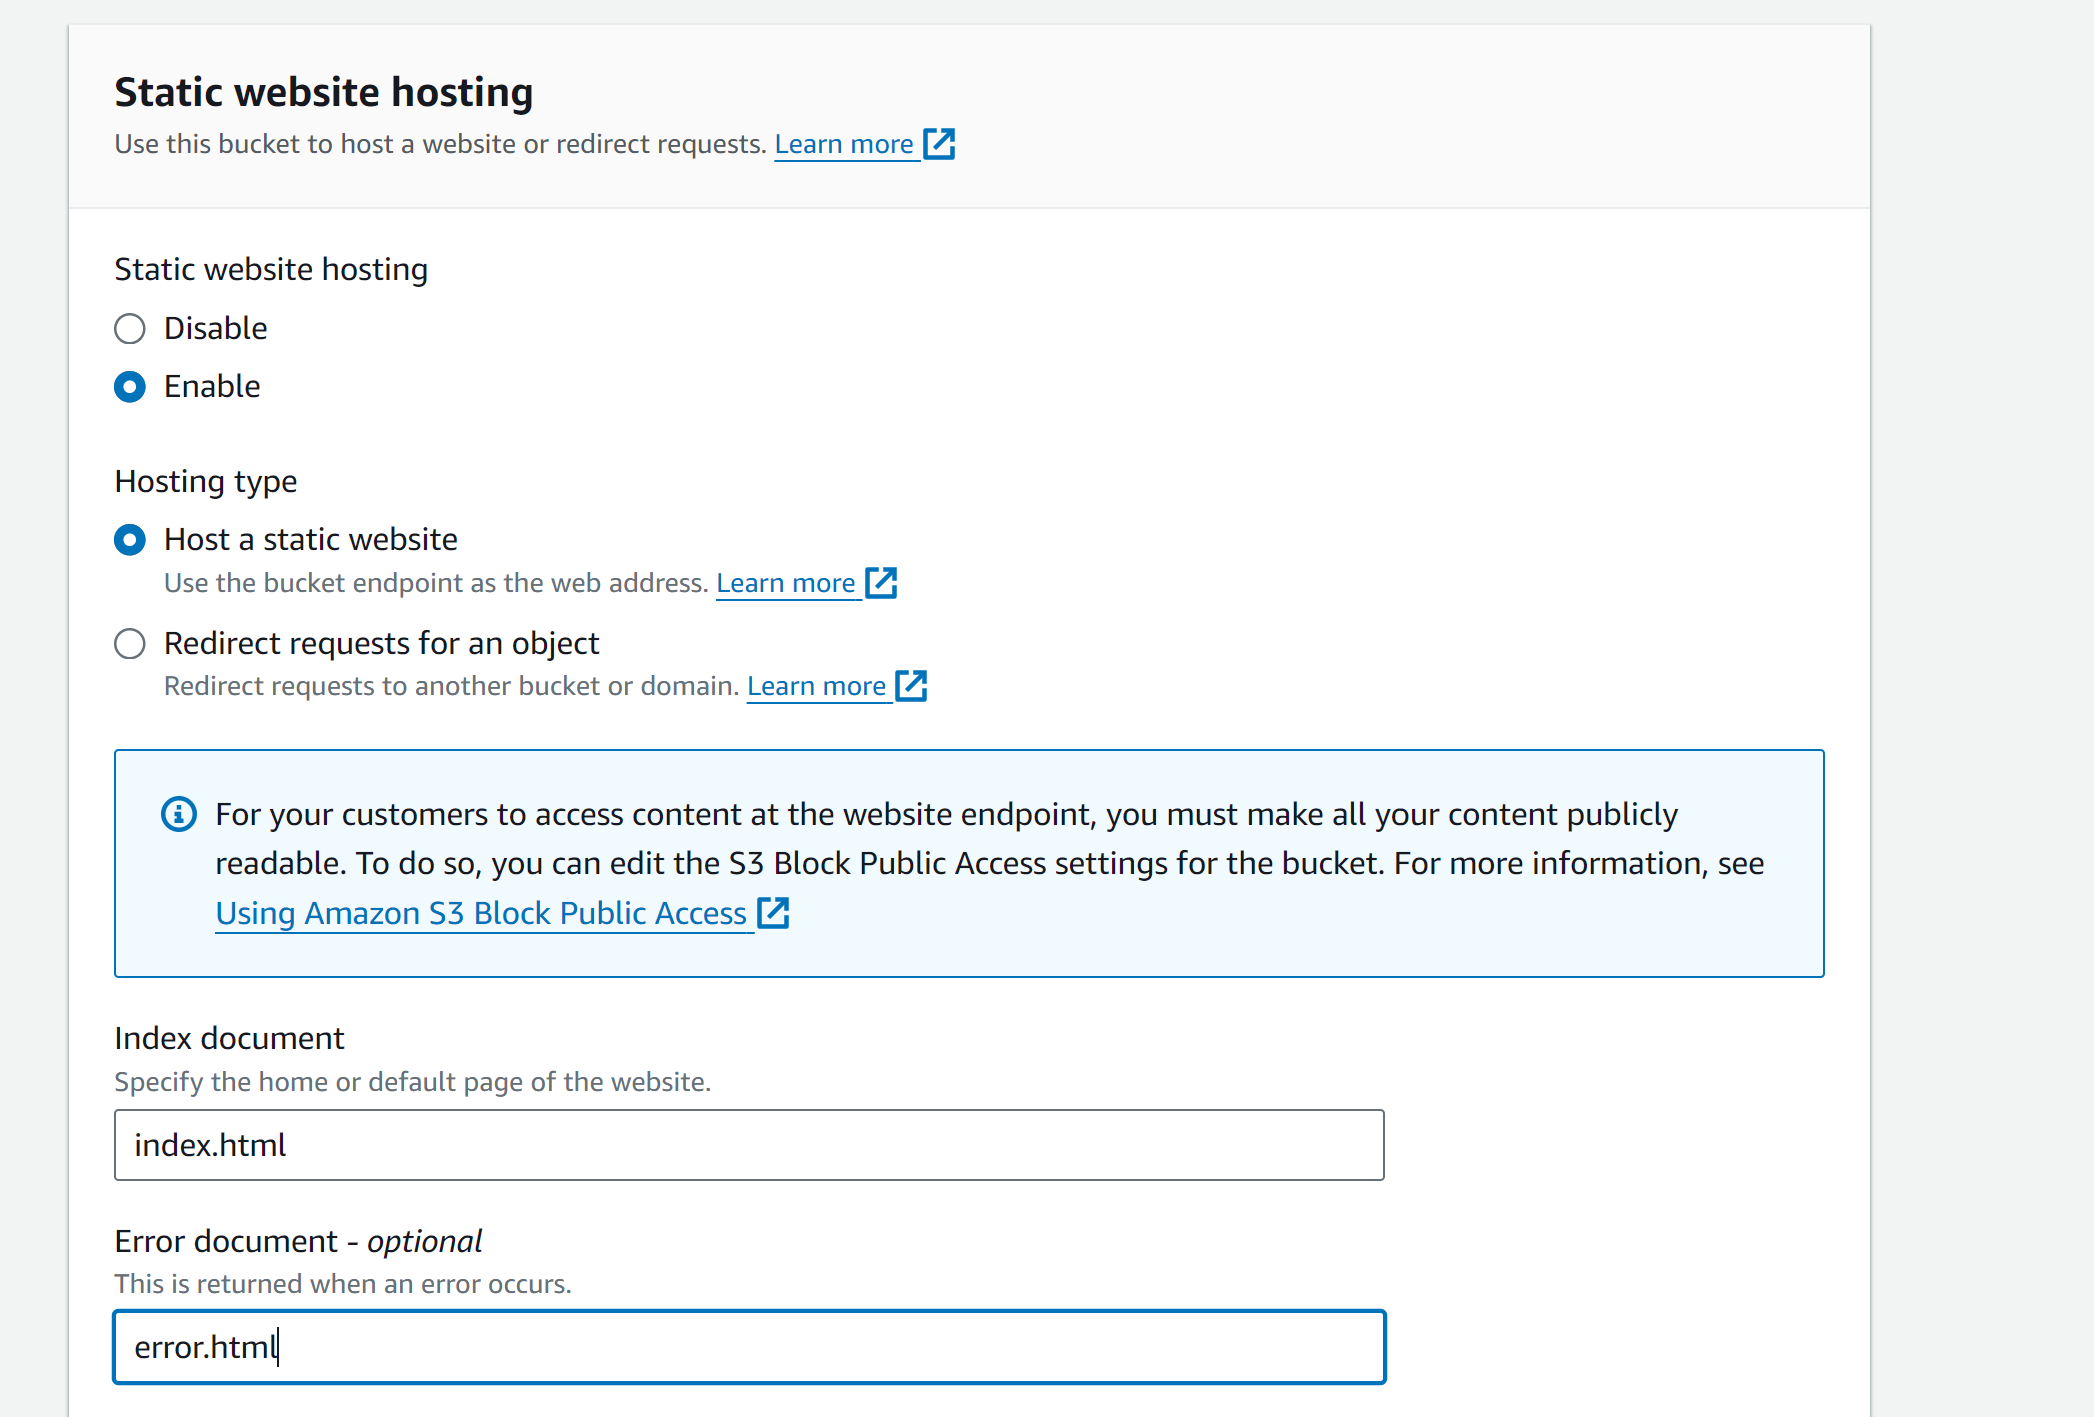
Once the bucket has been selected. Head over to the "Properties" tab and scroll to the bottom at the "Static website hosting" section. Click "Edit".
 When the new page loads click "Enable" in the "Static website hosting" section and select "Host a static website" in "Hosting type" section. Specify the index document as your homepage/landing page. For me, it was index.html. Optionally, you can specify an error document, if someone tries to navigate to a non-existant page in your site. For me, it was error.html. Then scroll, to the bottom of the page and hit "Save changes".
After the "Properties" have been updated, head over to the "Permissions" tab and scroll to the "Bucket Policy" section. Hit "Edit".

Even though we disabled blocking, so our resources are public, we haven't given permission to anyone to access what is in the bucket. So anyone trying to access a file in our S3 will be meet with a lovely access denied view.
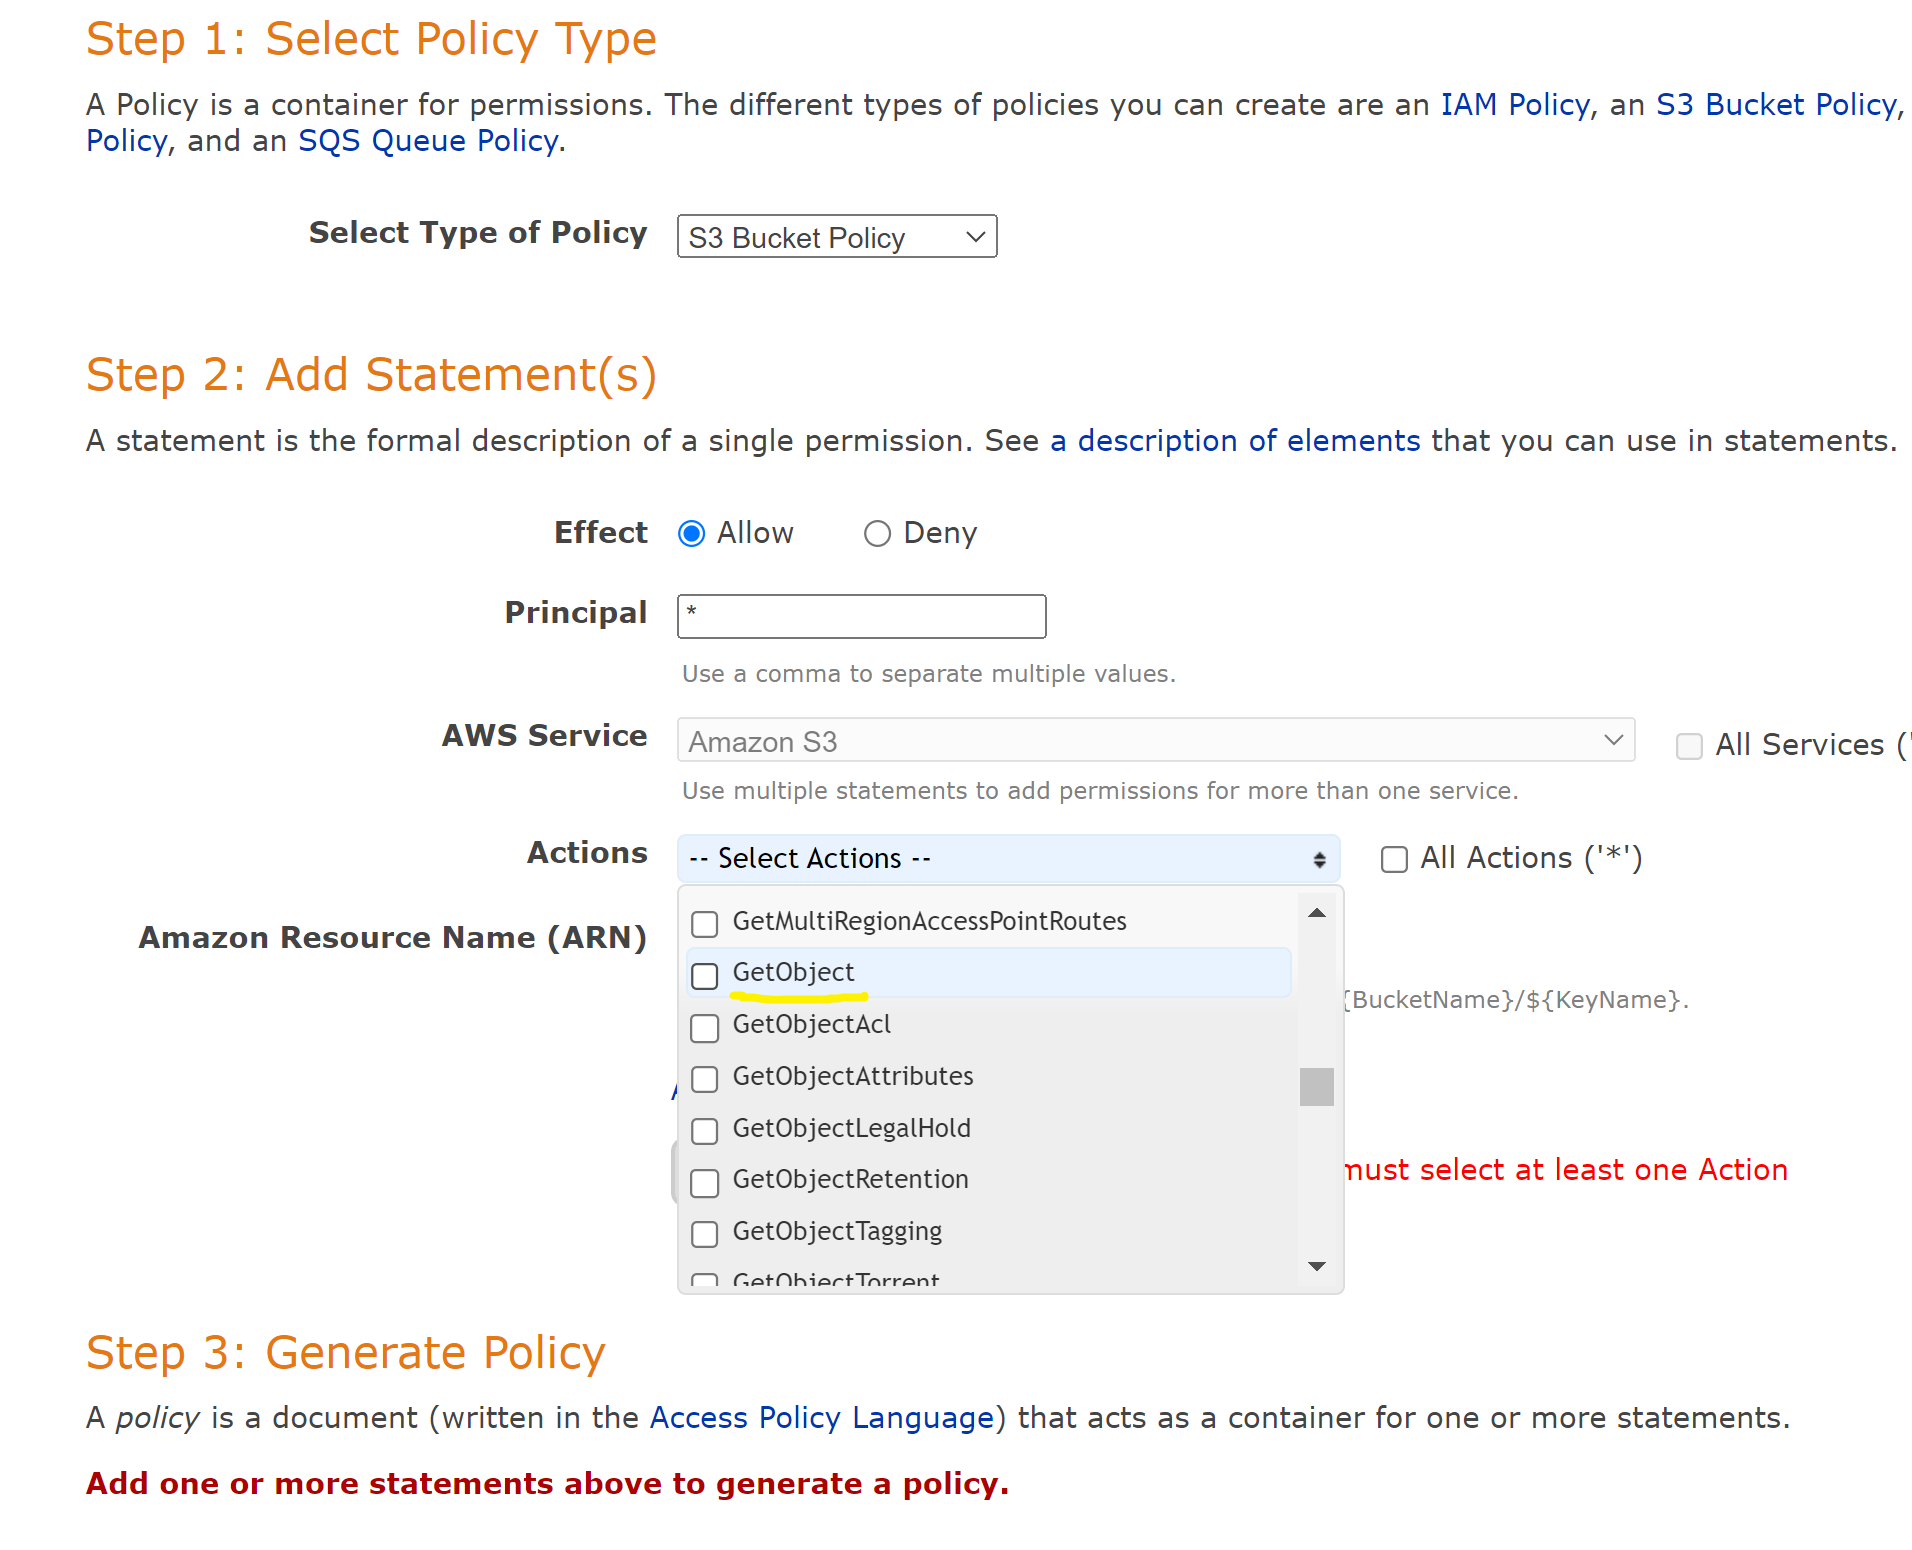
So to remedy this, we will add a bucket policy allowing access to our site content. Copy the following code, making sure to replace <YOUR_BUCKET_NAME_HERE> with your actual bucket name.
{
	"Version" : "2012-10-17",
	"Statement" : [
		{
			"Sid": "PublicReadGetObject",
			"Effect" : "Allow",
			"Principal": "*",
			"Action" : [
				"s3:GetObject"
			],
			"Resource" : [
				"arn:aws:s3:::<YOUR_BUCKET_NAME_HERE>/*"
			]
		}
	]
}
Or, if you prefer you can generate your own S3 bucket policy by utilizing this link. Just make sure that the s3:GetObject permission is included. That is what allows users to see the website.
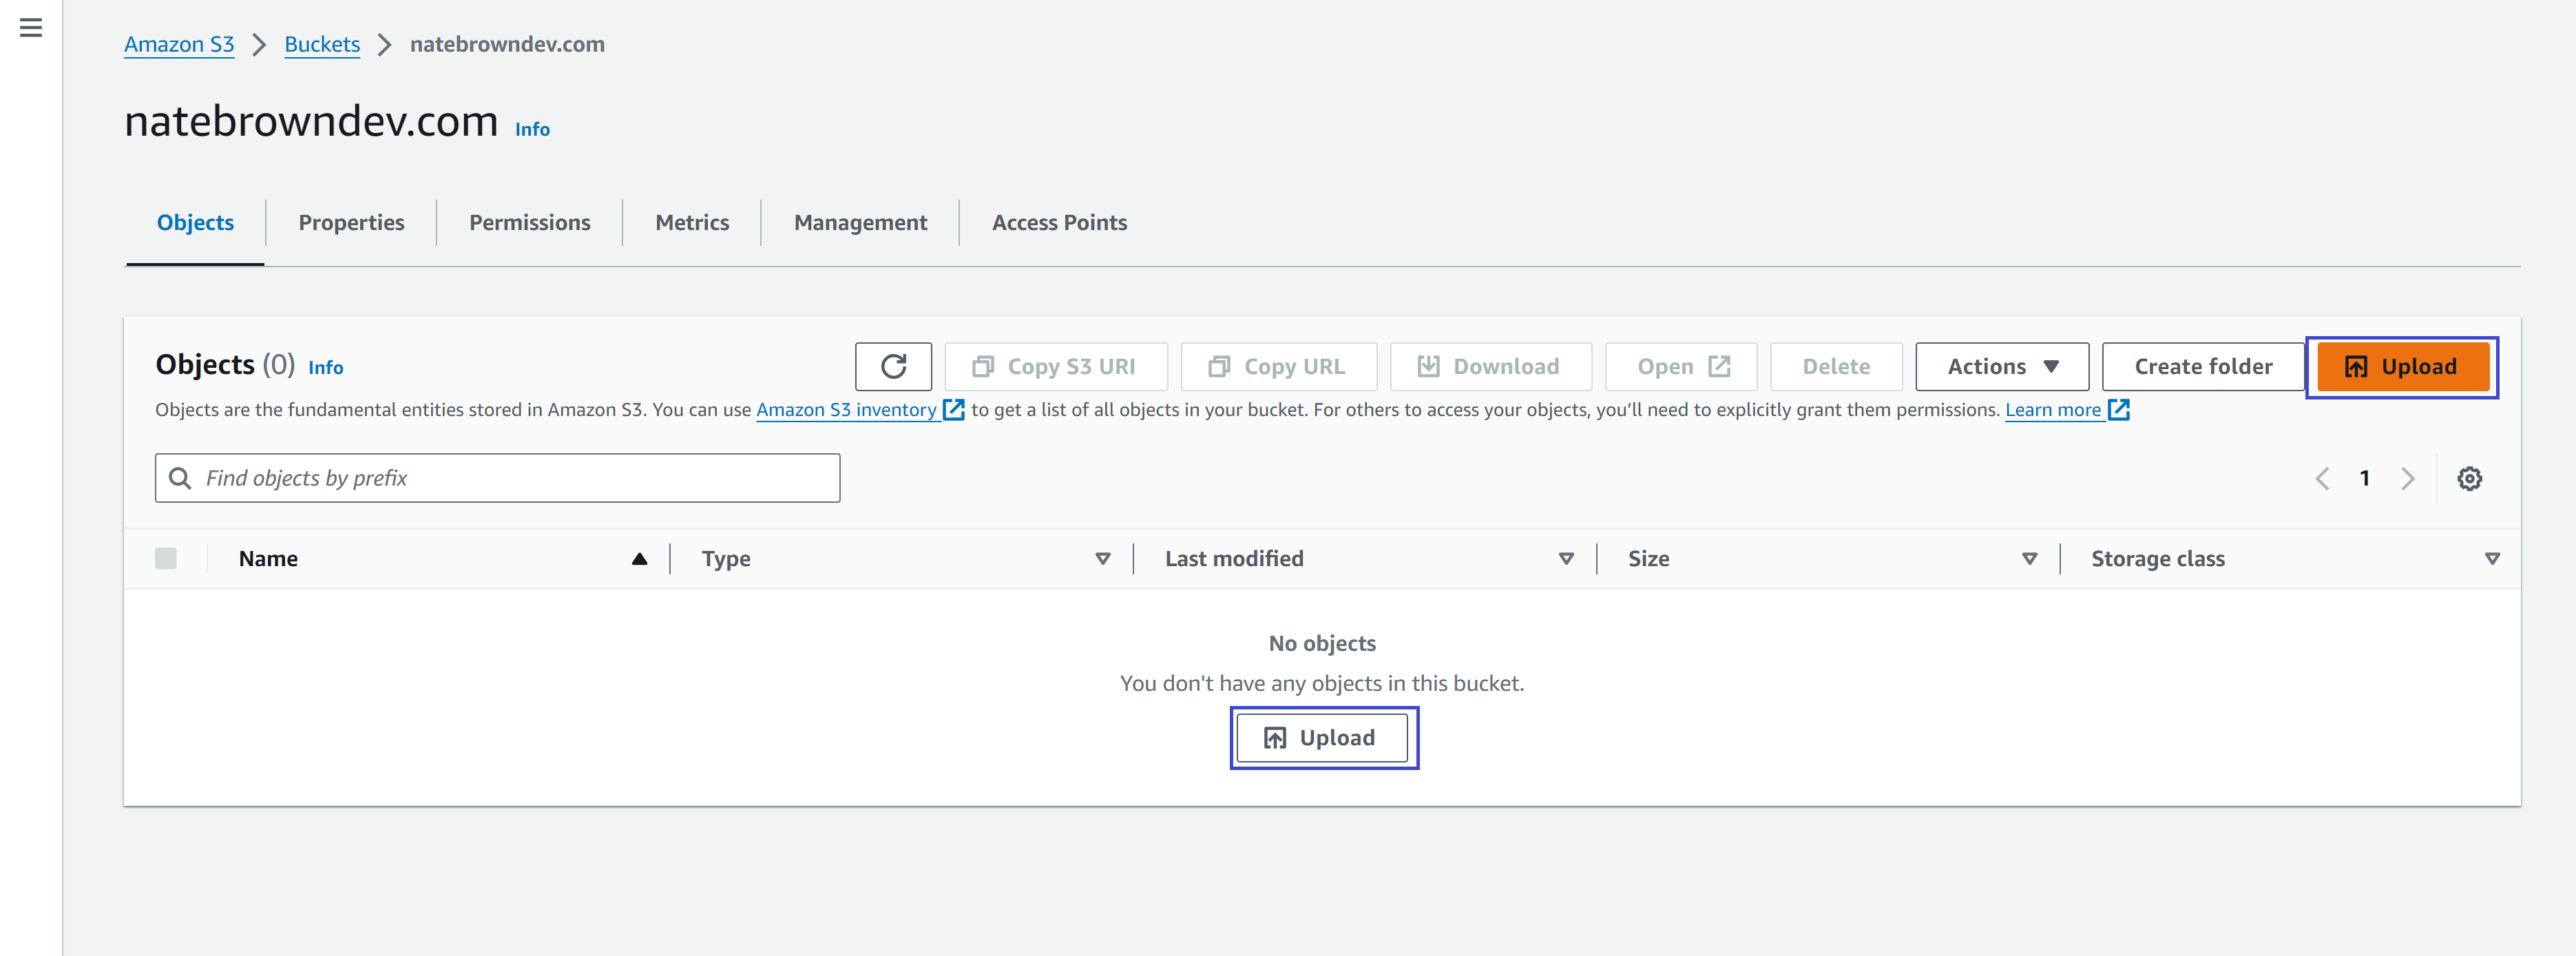
Once that is completed, go back to the "Objects" tab in S3. Then hit "Upload". Upload all your site content and wait for AWS to confirm it was successful.

Head back to the S3 homepage, we're are going to create a second bucket with the subdomain of www. That way when a user puts www.<YOUR_DOMAIN_NAME> in the browser they will be redirected to the bucket that contains the content.
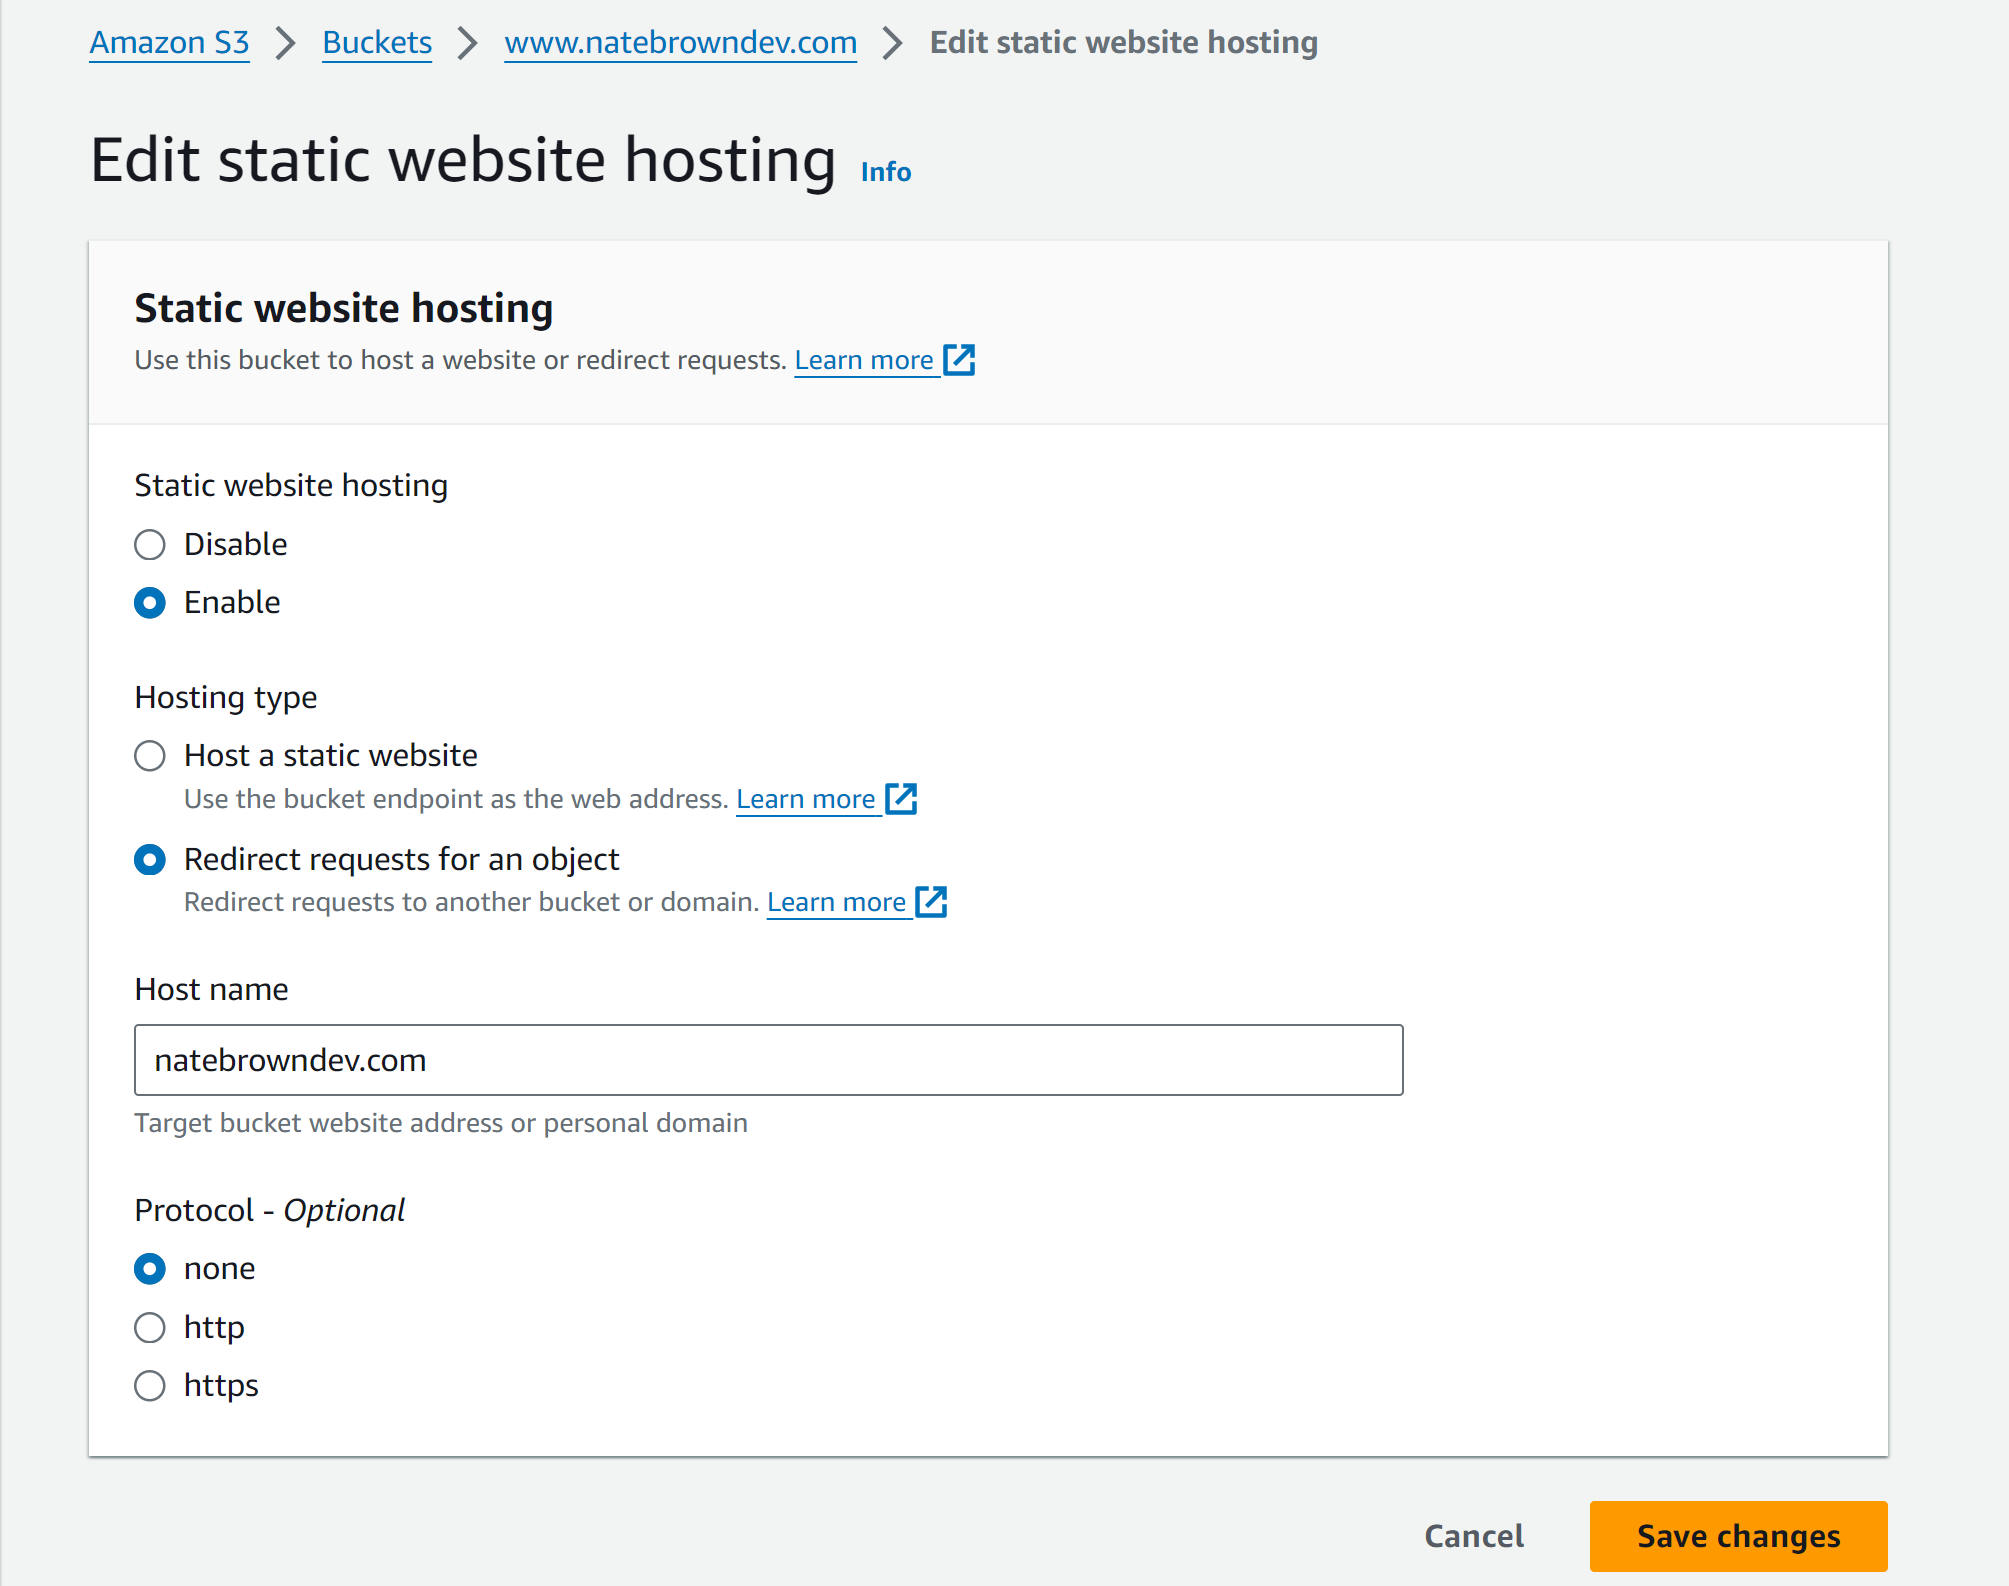
Make the second bucket with the name of www.<YOUR_DOMAIN_NAME> then click "Create Bucket". Once the bucket is created, selct into it and head over to the "Properties" tab and scroll to the bottom at the "Static website hosting" section. Click "Edit". Hit "Enable" in the "Static website hosting" section and then select "Redirect Requests for an object". You'll be required to put in the redirection location. It is just the name of your other bucket without the www. Leave protocol as "None". Hit "Save Changes" and you're done configuring this bucket! Since this bucket just redirects to the non-www bucket, AWS will use the other buckets access permissions.
One more step down, 2 more to go.
Step 3: Return to Route 53
Now we need to return to Route 53, so that our S3 site can appear under our domain, rather than the AWS generated-name. In Route 53, go to "Hosted Zones" and click on your domain.

In the "Records" subtab, hit the "Create Record" button. We will create an A record for each one of our buckets.
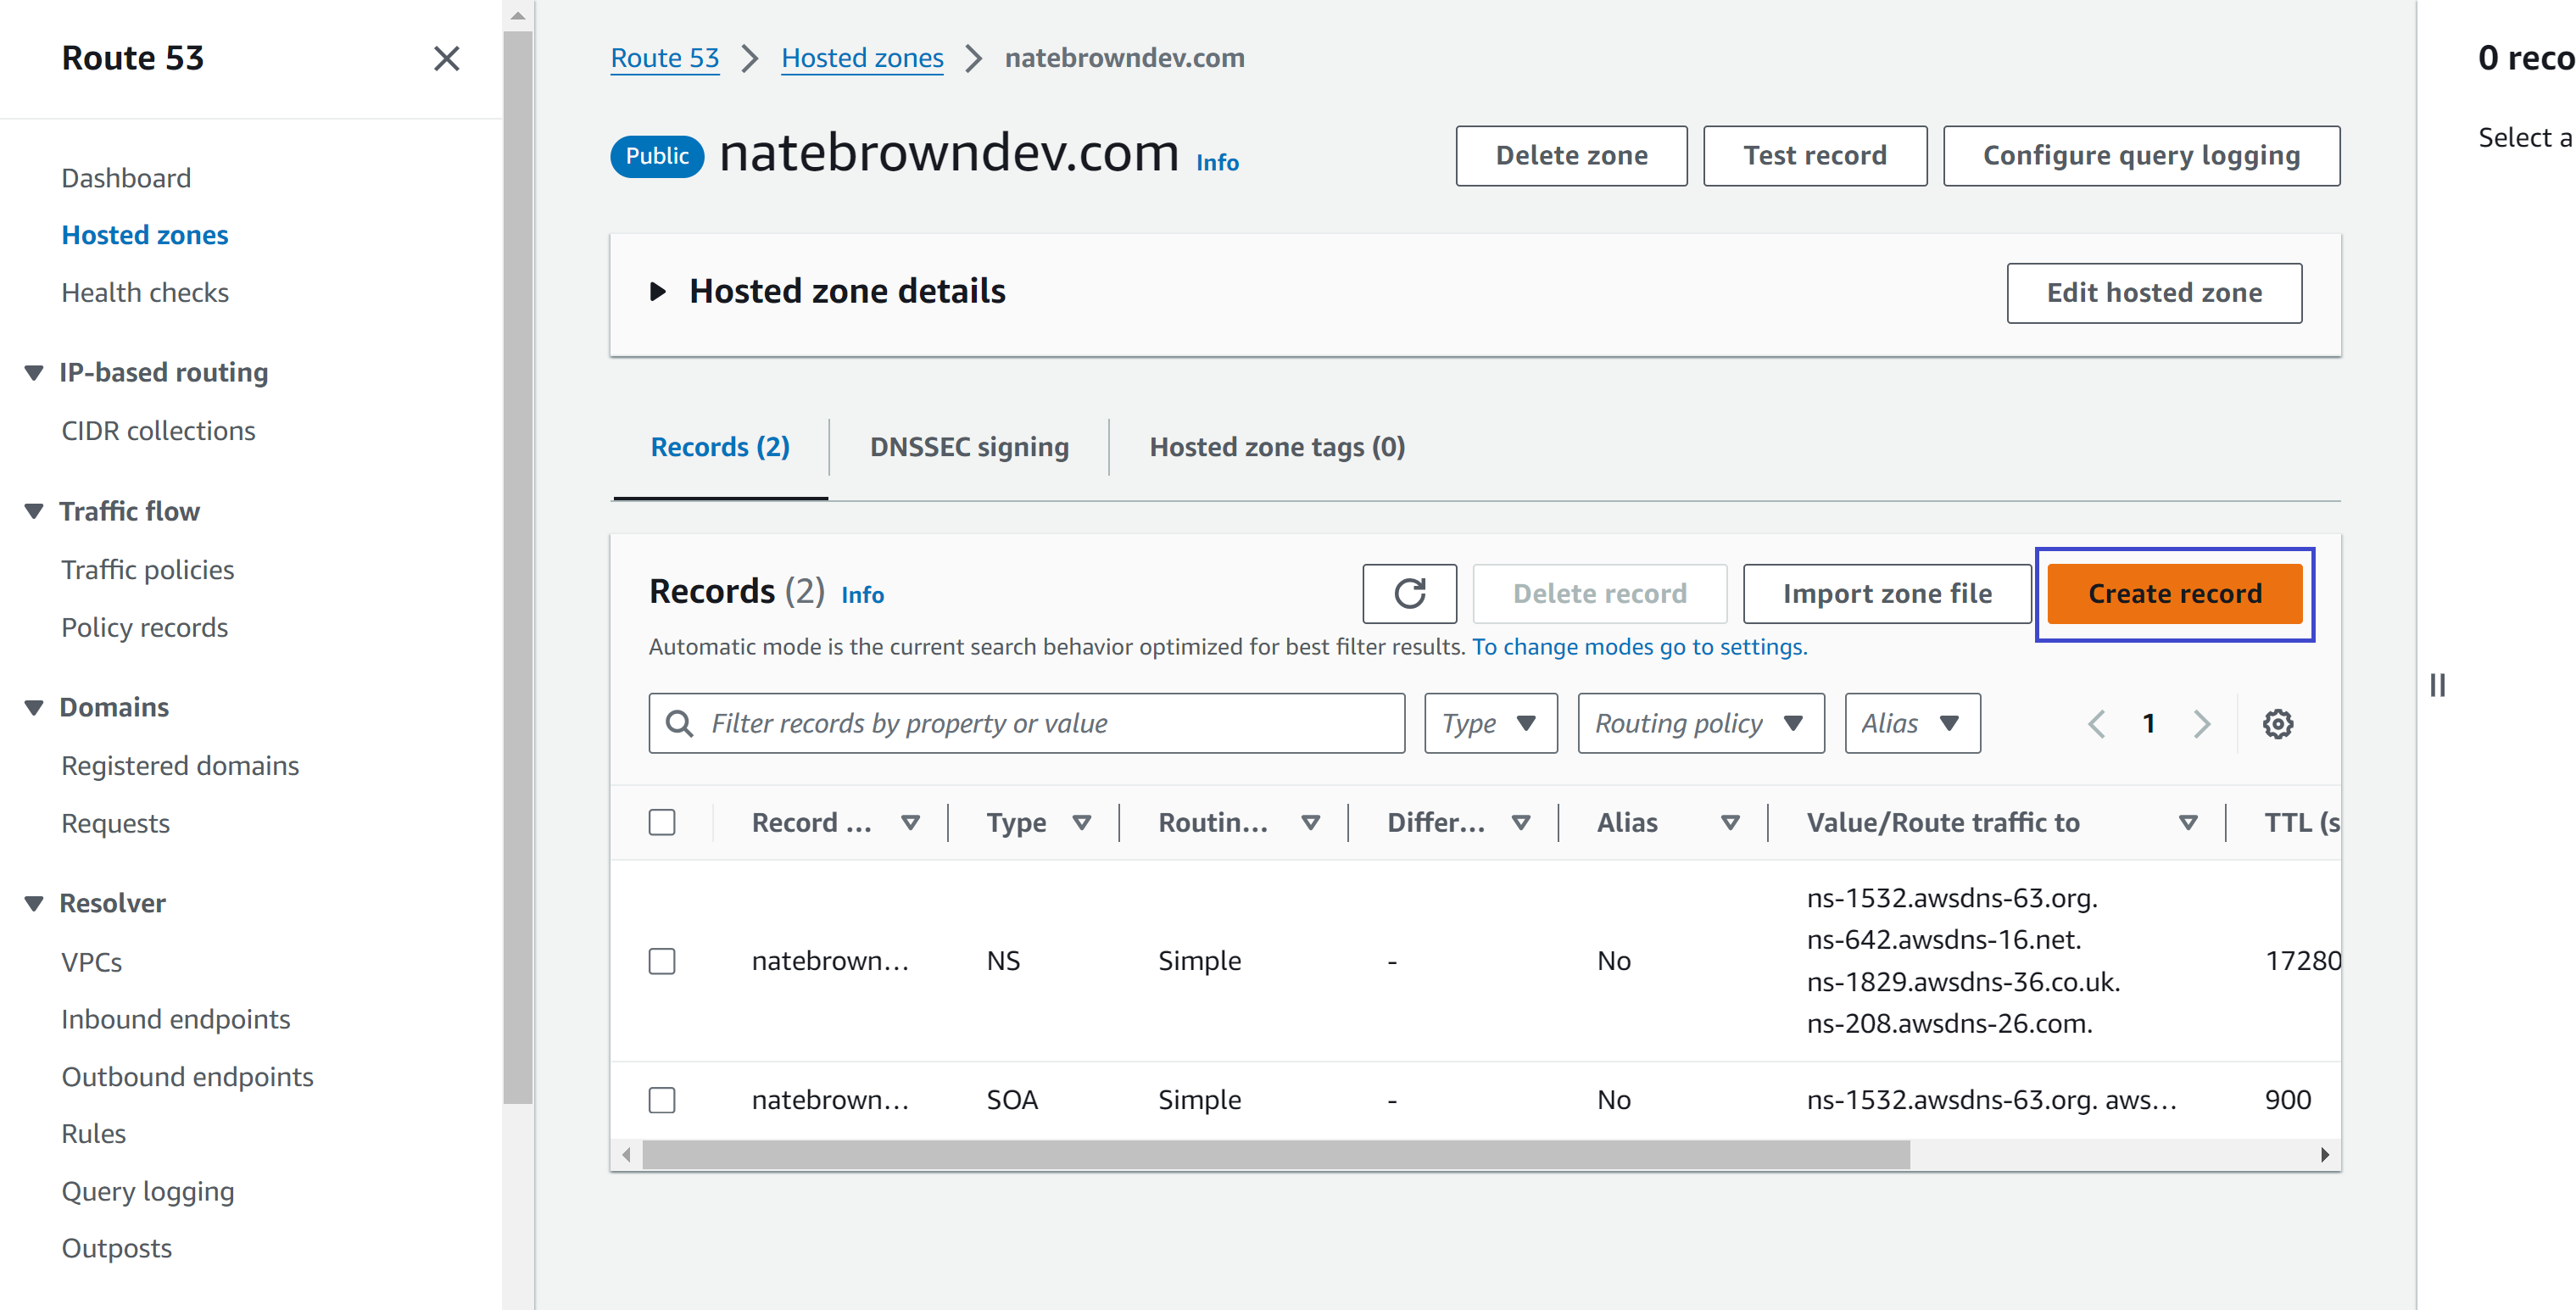
We'll start by defining an A record for the www domain. Type "www" into the record name section. Then select A for the "Record Type". In the "Value/Route traffic to", select Alias to S3 website endpoint, making sure you select the region your bucket is in. In my case, my bucket was in the N.VA region. Finally, select the bucket from the dropdown and turn "Evaluate target health" off. This feature will alert you if the endpoint is unreachable but it is not a free feature.
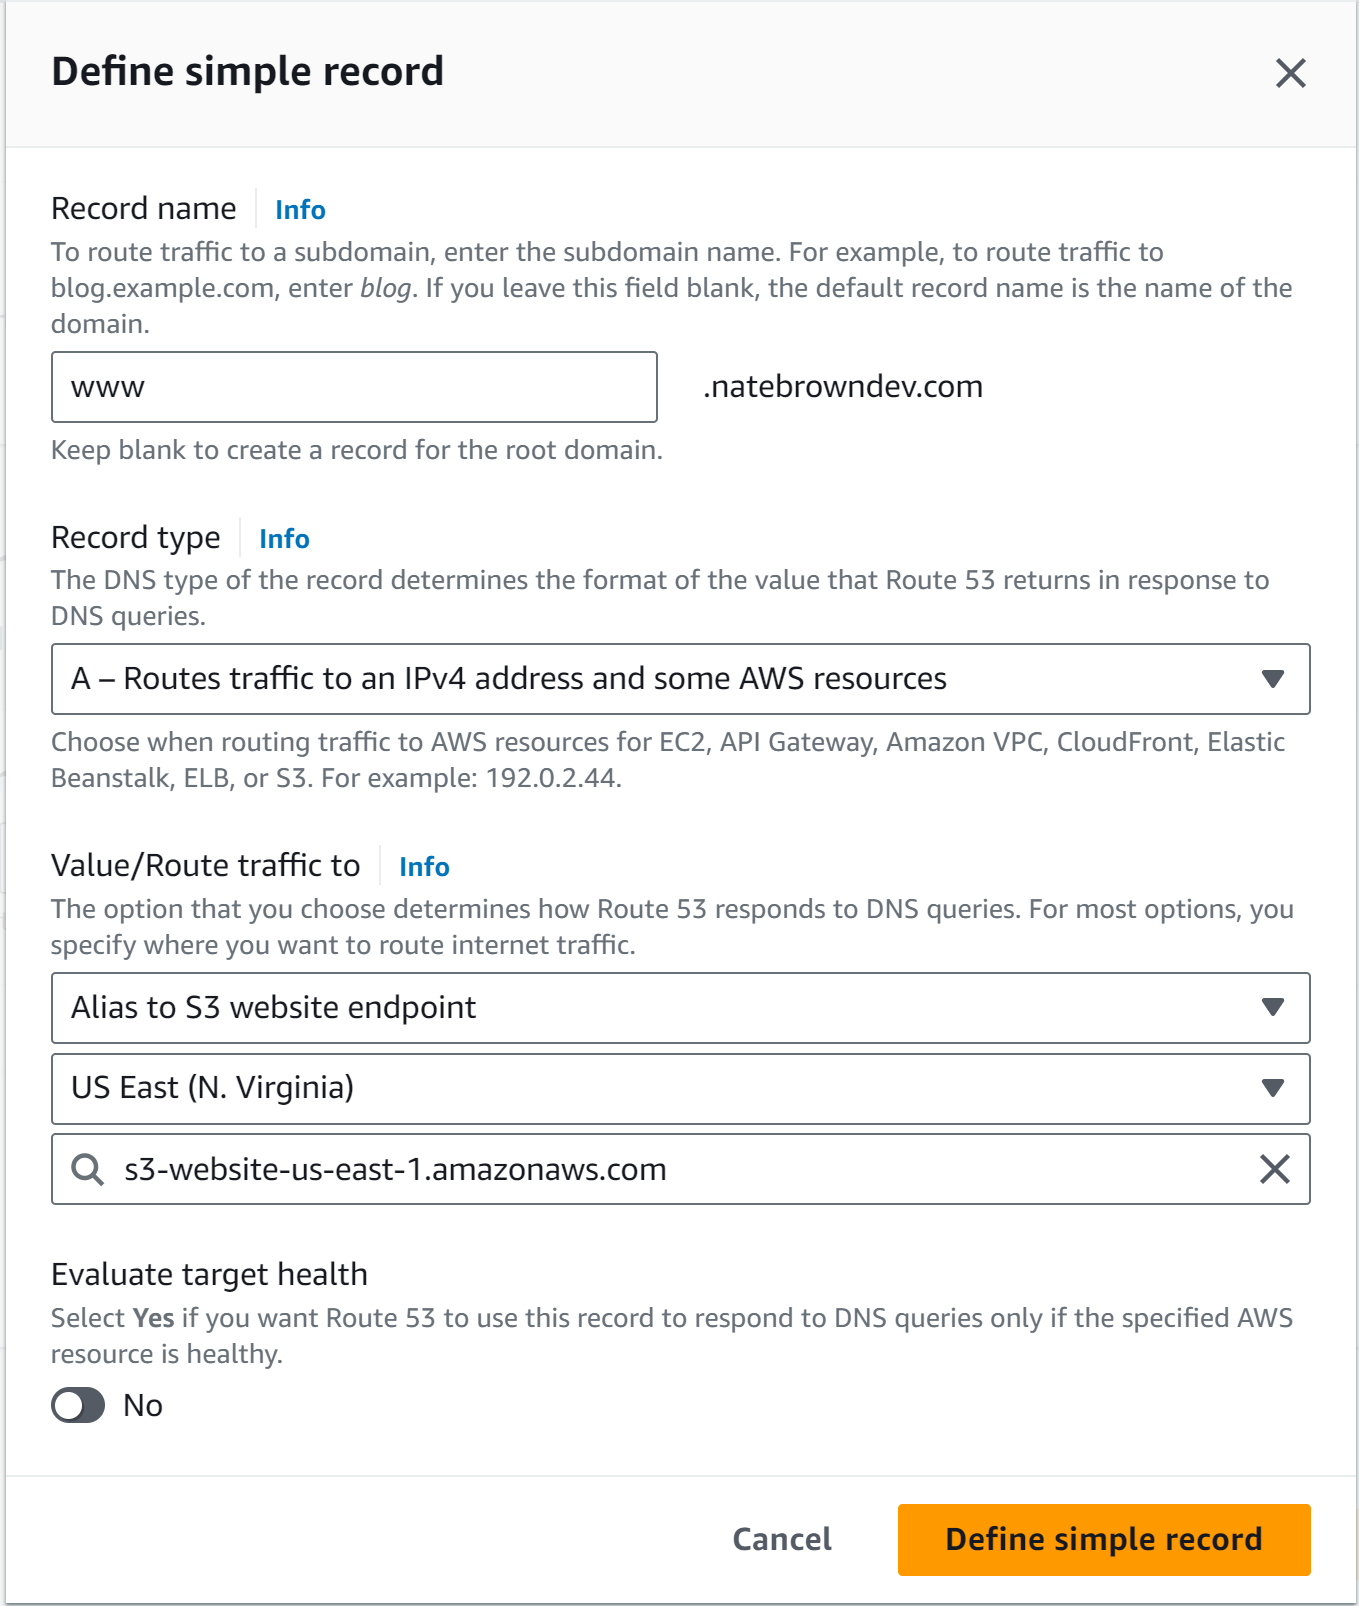
After the record is created, hit the "Create Record" button again to create a second A record. This one leave the "Record name" section blank. This will point to the main bucket with the content in it. Then fill out the rest of the info as above, selecting the main bucket from the dropdown.
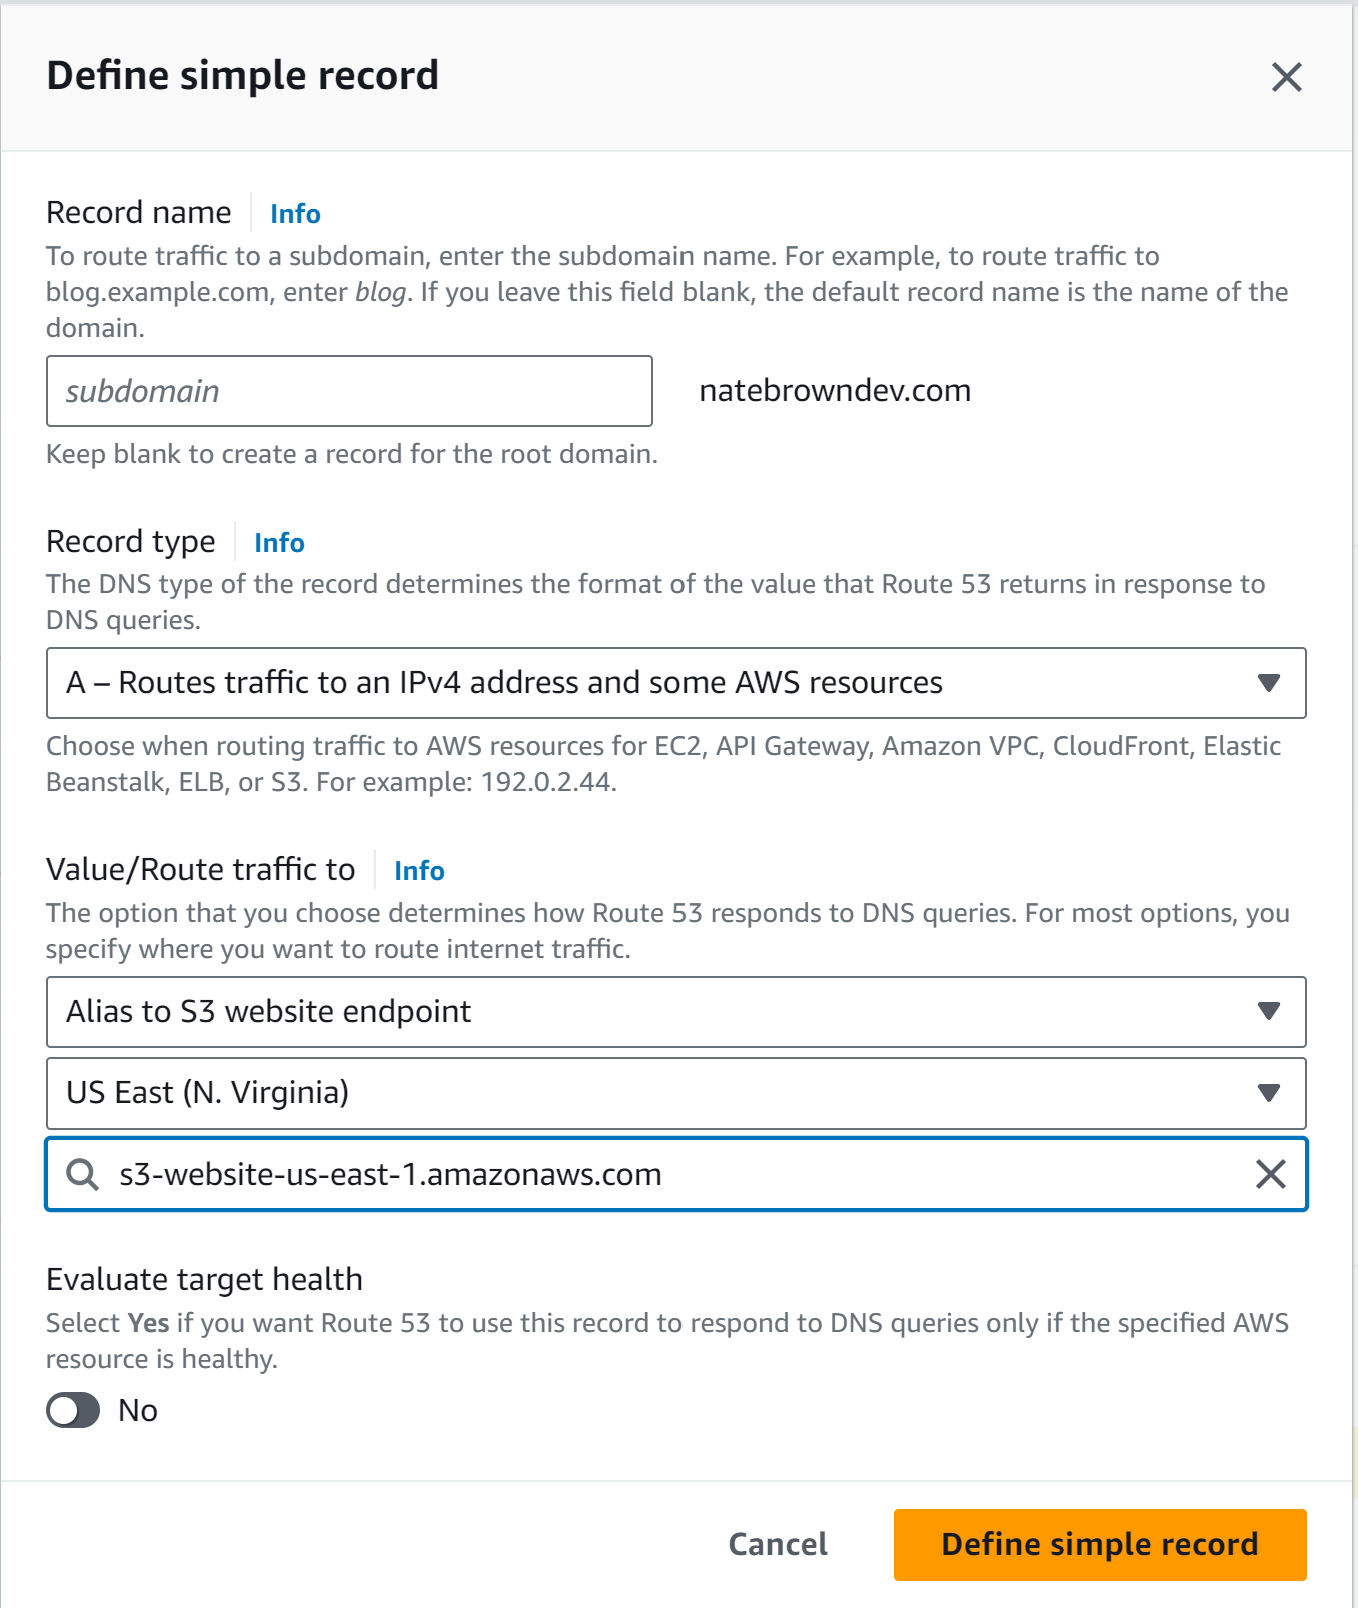
Congrats! Now that everything is set up in Route 53, your website is available on the web under the domain you purchased previously. However, notice that yor website is only available over http. In order to fix this issue, we'll introduce a CDN service to our website
Step 4: Setting up the CDN
Since it is just a static site, you could leave it here. Our site is now available on the internet. BUT, if you look closely it labled "insecure" by Chrome. This is because S3 buckets can only serve content over http. So we need a layer over our Route 53 routing in order to have our content served over https (and thus be secure). Readers might be shocked that Route 53 can't do that for us, but that is because Route 53 is a pure DNS solution. It won't issue SSL certificates and expects the host that connects to it to have those certificates. This is the crux of our problem, our S3 is not a true server in our control, so it can't contain SSL certificates. I chose Cloudflare for that layer.
Cloudflare vs. CloudFront
You could select CloudFront instead of Cloudflare, to serve https content from a S3 bucket to the open internet. CloudFront is the AWS equalivalent of Cloudflare. The reason I chose Clouflare instead of CloudFront is simple. I wanted to diversify my technology stack. I haven't worked with Cloudflare in the past but the same can't be said for CloudFront.
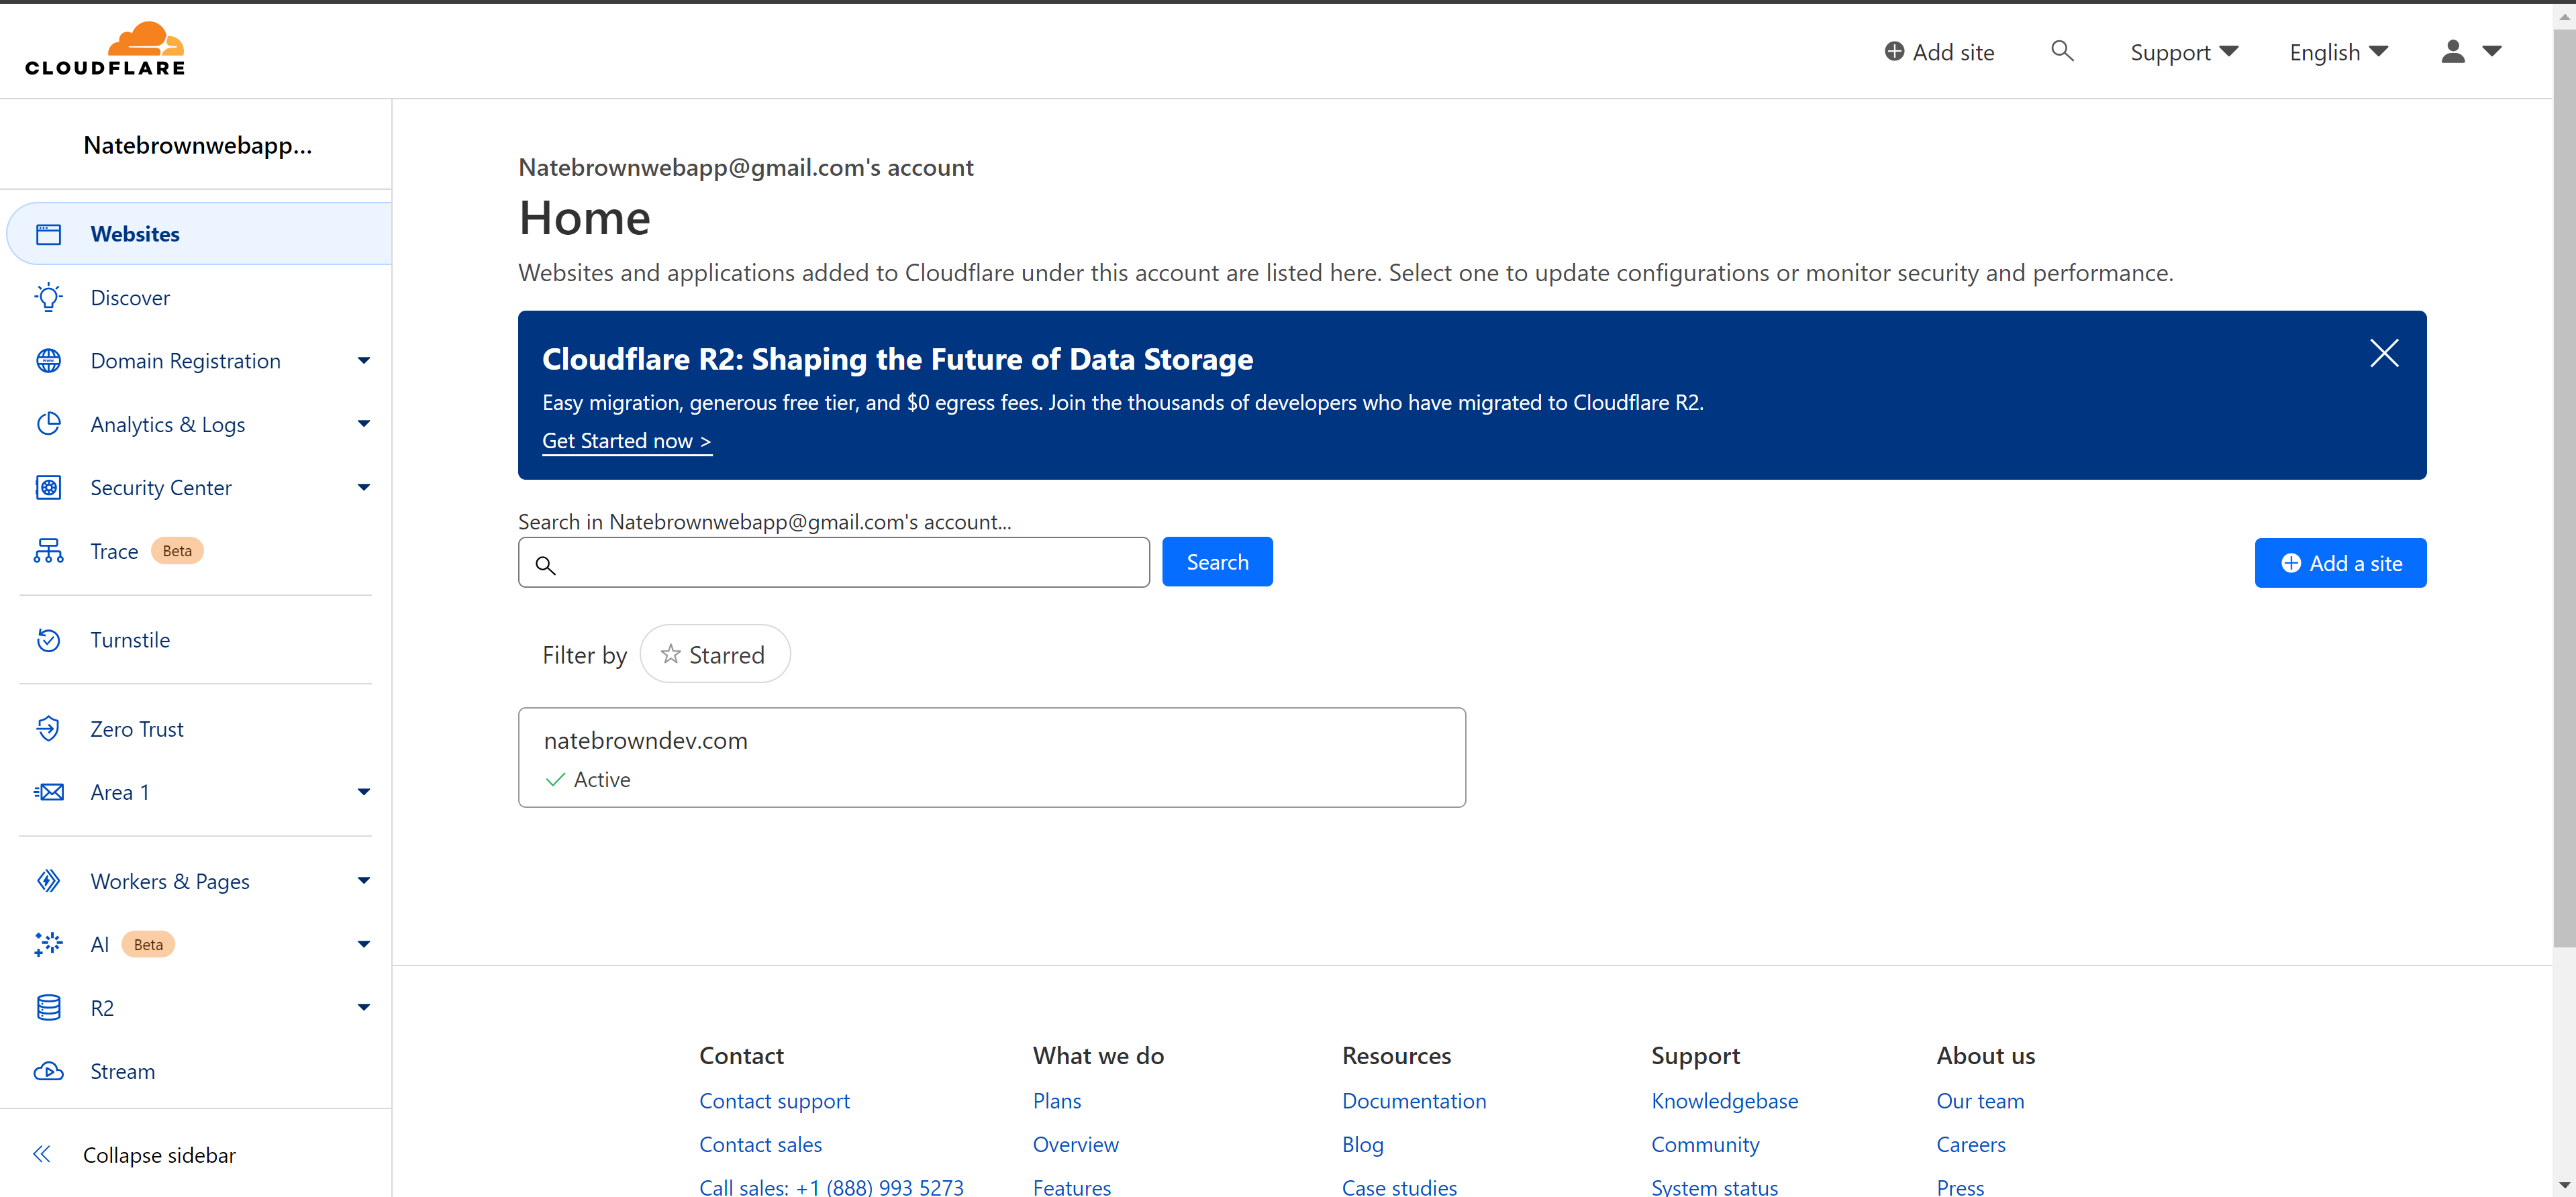
Create a free Cloudflare account. After signing up, Clouflare will force you to verify your email before doing any functionality. Once your email is verified, then go and select "Transfer Domain". Follow the instructions to transfer a domain to Cloudflare, Cloudflare should automatically pickup the domain we registered with AWS.

Once you find your domain, review the record that will be imported into Cloudflare, all this should be automatic with no additional configuration. Import your domain, it could take up to 24 hours to sync but in my experience it never takes more than 5 minutes.
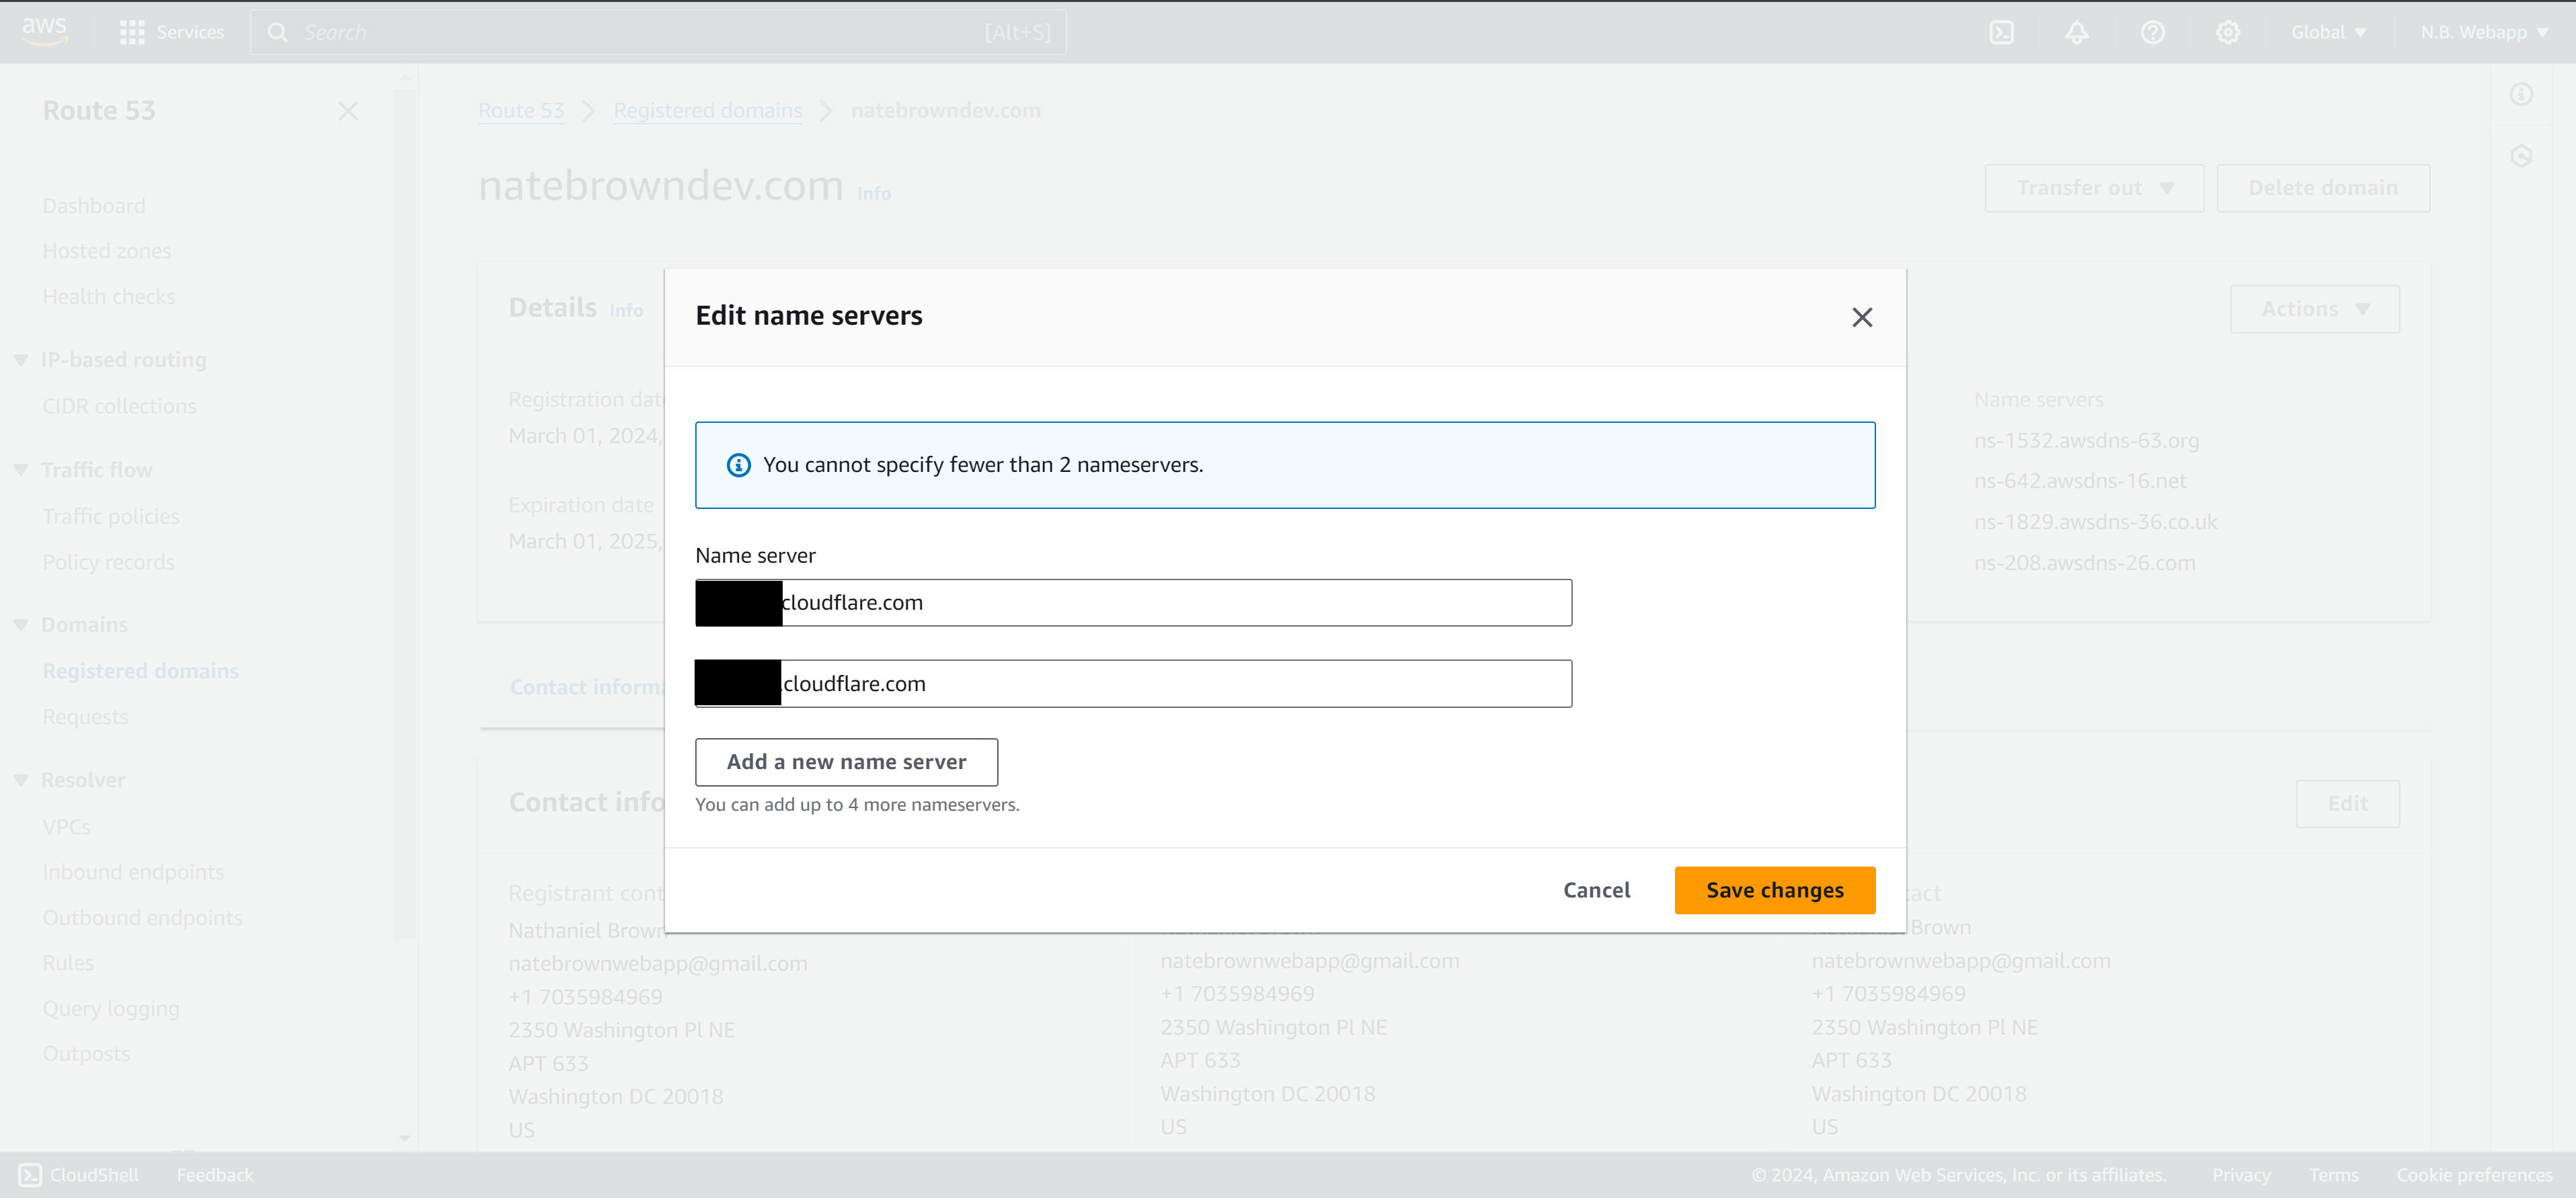
After your domain is imported to Cloudflare, Cloudflare will provide nameserves used to serve content. We'll need to take these Cloudflare name servers and copy them into Route 53. Back in AWS Management Console head to Route 53. In Route 53, head over to the "Registered Domains" tab and click "Edit"

Add the two Cloudflare name servers here then, delete the existing AWS name servers. That way you'll use Cloudflare to resolve DNS queries instead of Route 53.
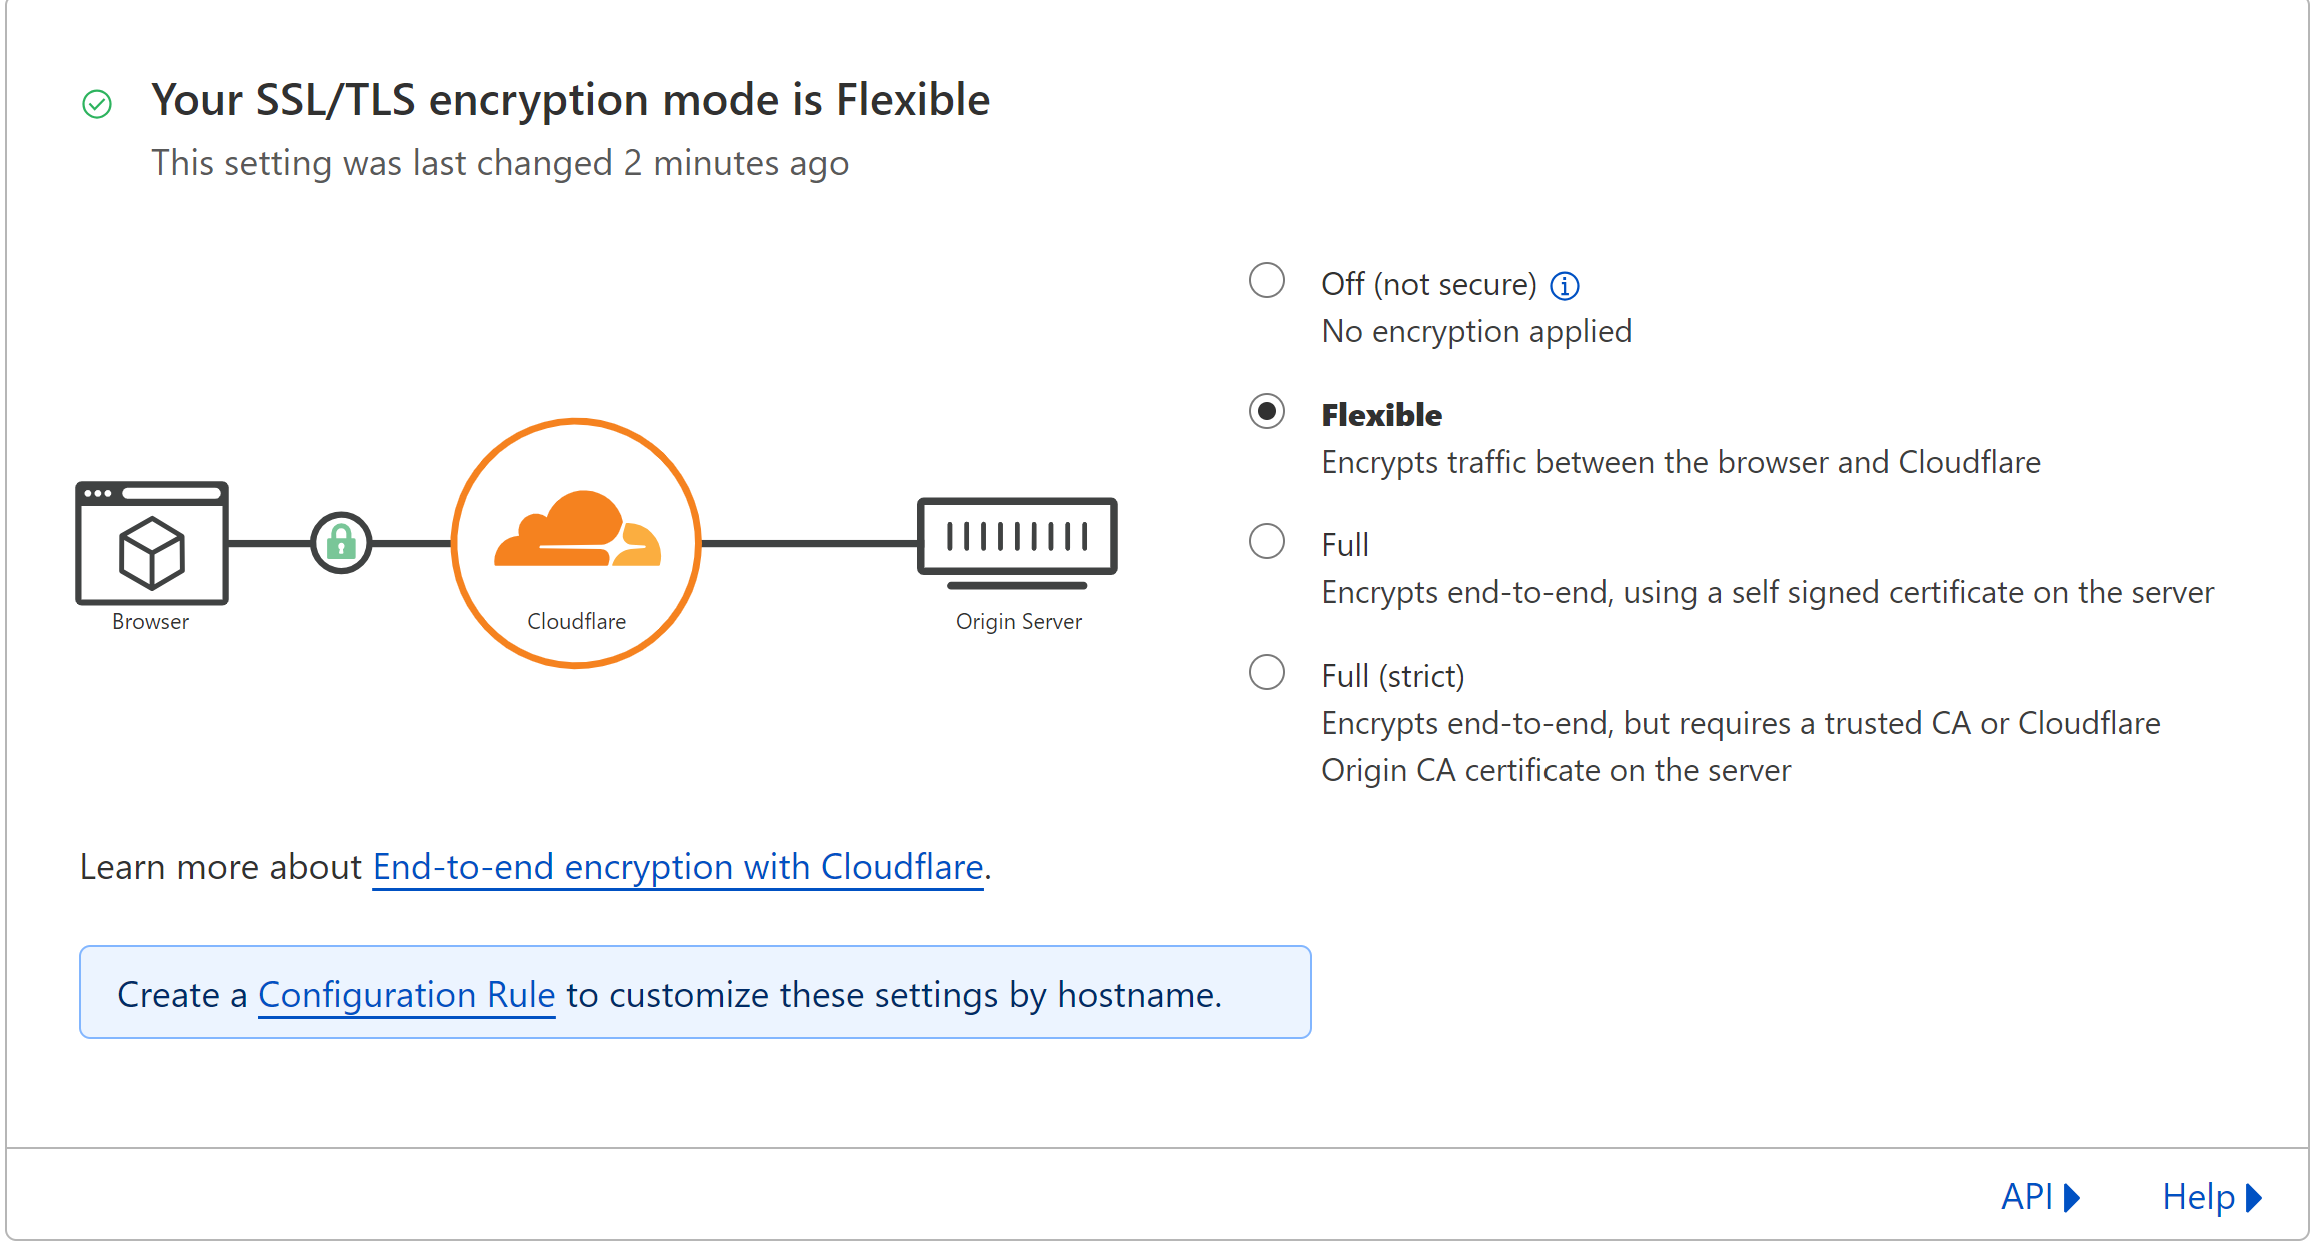
Since S3 doesn't support https natively, we need to change Cloudflare's Configuration Rule to set the SSL mode to flexible. Back in Cloudflare console, go to "Websites" and select your transfered domain. Then go to the "SSL/TLS" tab then select the encryption mode as "Flexible".
Now if you go to your site, it is served over https, success!
Conclusion
And there you have it! If you followed this tutorial then you have a fully functional static site that can be accessed anywhere in the world over https. I hope you found this useful or interesting. If you have any tips for how I could have better explained this, or any comments about how I could improve please email me.